
I’m sure some of you have been wondering where I’ve been since July, so I made a video explaining it.
Category: Uncategorized
Paddington Bear’s Coat Card
I apologize that my circle light swung into the frame and I didn’t know it. These things happen sometimes, but it still makes me feel terrible.
I bought these papers and ephemera because I had purchase the briefcase the bear carries for Finn for Christmas full of Paddington Bear books, and thought it would be fun to send his dad a Paddington Bear card for Father’s Day.
Use 5 x 10″ blue cardstock scored on th 10″ length at 2 1/2″ and 7 1/2″ then turn to the 5″ length and score at 1″. Cut on the 2 1/2″ and 7 1/2″ scores up to the 1″ score and then fold and burnish the three sections where you have cut. I folded the long scores so it becomes a coat..then cut the shoulders out by folding the 1″ score up on the back of the coat and cut it off on the front of the coat..the front is where the opening is. Then angle a cut on the top right about 1/2″ from the top and angled into the top about 1/2″ from the right side. Then bend the card in half so you can make the same angled cut on the other side. Cut the 1″ score straight down from the center so it lines up with the opening of the coat. Then cut an angle straight cut from the opening on the 1″ scored area to where the shoulder cut stops, closest to the center of the coat to create the collar. In the end, I cut this collar off straight across the top of the card and used foam squares under the collar to glue it to the top of the card so it looked better..
For the (sleeves) arms, I cut two strips 4″ long by 1″ and I used Night of Navy ink by Stampin’ Up and inked around the arms, then put foam tape under the strips, and laid the arms about 1/8″ from the edge of the card and once I attach the sleeves, I cut the top of them so they match the shoulder angle. I added two pockets in navy blue that were 1 1/4″ wide by 1 3/4″ tall and inked the edges. I used a thin tear tape 1/8″ wide and put the tear tape on three sides in case I wanted to put something in the pocket once it was attached (which I didn’t.) I should have put the pockets on before the sleeves, but didn’t and had to pick up my sleeves to add the pockets.
I found an image of the bear wearing his hat, so I took a piece of red cardstock and freehand the hat with a black marker then cut it out making sure the marker lines were intact. I retraced the marker lines when I was finished so they made the hat stand out. I cut ot the hat and glued it to the coat on an angle.
I glued a piece of the patterned Paddington bear paper that was 4 3/4″ x ” inside the card then cut the excess off the back at the top once the coat was closed.
I had the word “hello” die cut three times and glued together and glued this to the left pocket, then had some rub ons that I glued to the other pocket.
To make the coat toggles, I drew a toggle shape on a light brown cardstock then cut it out and traced it onto the paper 12 times and cut those out then glued three together, four times to make four toggles. I used a black twine that was way too thick and hard to work with, and wrapped a length around a toggle twice and left a small gap, then wrapped it around another toggle and put a piece of Velcro under both toggles gluing them in place with hot glue. I did this again for the second set of toggles, and hot glued the Velcro to the coat.
I had a Hero Arts stamp/die set called “Happy” that I used to stamp on 2 1/2″ round punched white cardstock in black ink with “Fathers Day” that came in the same stamp set. I put a 3″ scallop circle in red under the white round and glued these to the center of the inside of the card.
I also glued some Paddington bears from the set I bought on Craftstash. The card fits into a 5×7″ envelope, but wouldn’t have if I had glued the hat above the coat.)
Paddington Bear : (I couldn’t find it on the craftstash.us site, only their uk site, fyi)
Paper: https://www.craftstash.co.uk/paddington-8in-x-8in-paper-pack-24-sheets-paddington-collection.html
Ephemera Pack: https://www.craftstash.co.uk/paddington-a6-ephemera-pack-set-of-32-paddington-collection.html
Using Scrap Cloth & Rope to Cover a Bucket
I had leftover fish outdoor fabric from making a pillow that I bought at Joanns link: https://www.joann.com/minnows-indigo-outdoor-fabric/19169721.html and bought a skein a rope at a garage sale that I thought I could cover with the fabric and then hot glue to a metal bucket.
I cut the fabric to about 2″ wide and the length of the fabric (around 52″ wide) in strips. I used four strips to cover the rope and the bucket. I laid the rope in the center of a strip and hot glued the center of the rope to the center of the fabric. Then I covered the end of the rope with a scrap of fabric and hot glued the fabric around the end of the rope. Next, I hot glued one side of the fabric around the rope as taut as possible, and then continued down one side of the fabric to the end of the rope. Then take the other side of the fabric, put hot glue under it and roll the fabric on a silicone mat so the material surrounds the rope and keeps your fingers out of the way from being burned. I did this about a foot at a time as I seemed to be able to control that much rope.
If you decide to do this project, instead I’d use a cotton clothesline rope like this. https://tinyurl.com/nx2xy6k2
When you get to the other end of the rope and have surrounded it with fabric, take another scrap of fabric and wrap it over the end and around the sides so it looks finished like the rest of the rope. Once you’ve covered the entire rope, take your bucket and starting at the spot near the top you’ve chosen as your starting spot, hot glue the end of the rope to the bucket and then keep gluing and wrapping the rope to the bucket, making sure there are no gaps between the bucket and the rope and no gaps between each row of rope, so you’ll put glue on the bucket and on the top of the rope that you’re adhering to the row of rope above it, since you are working your way down the bucket. Keep gluing and wrapping until you run out of rope. I was able to wrap mine around the bucket and under the bottom of the bucket so it all looks finished.
If you have any shiny areas where the hot glue is too thick, use either a heat tool or a blow drier and melt the hot glue and wipe it off with the metal ends of your scissors. Heating it will also melt the frayed fabric ends that might be sticking out and will eliminate any hot glue strings as well.
My plan is to put a napkin inside the bucket and wrap it over the top so it looks finished.
A Father’s Day Miracle
If you read my blog, you know I’ve given up writing my personal thoughts here. I had written hundreds of them in the early years of the blog, but have lost my mojo in recent years. This Father’s Day made me rethink my message.
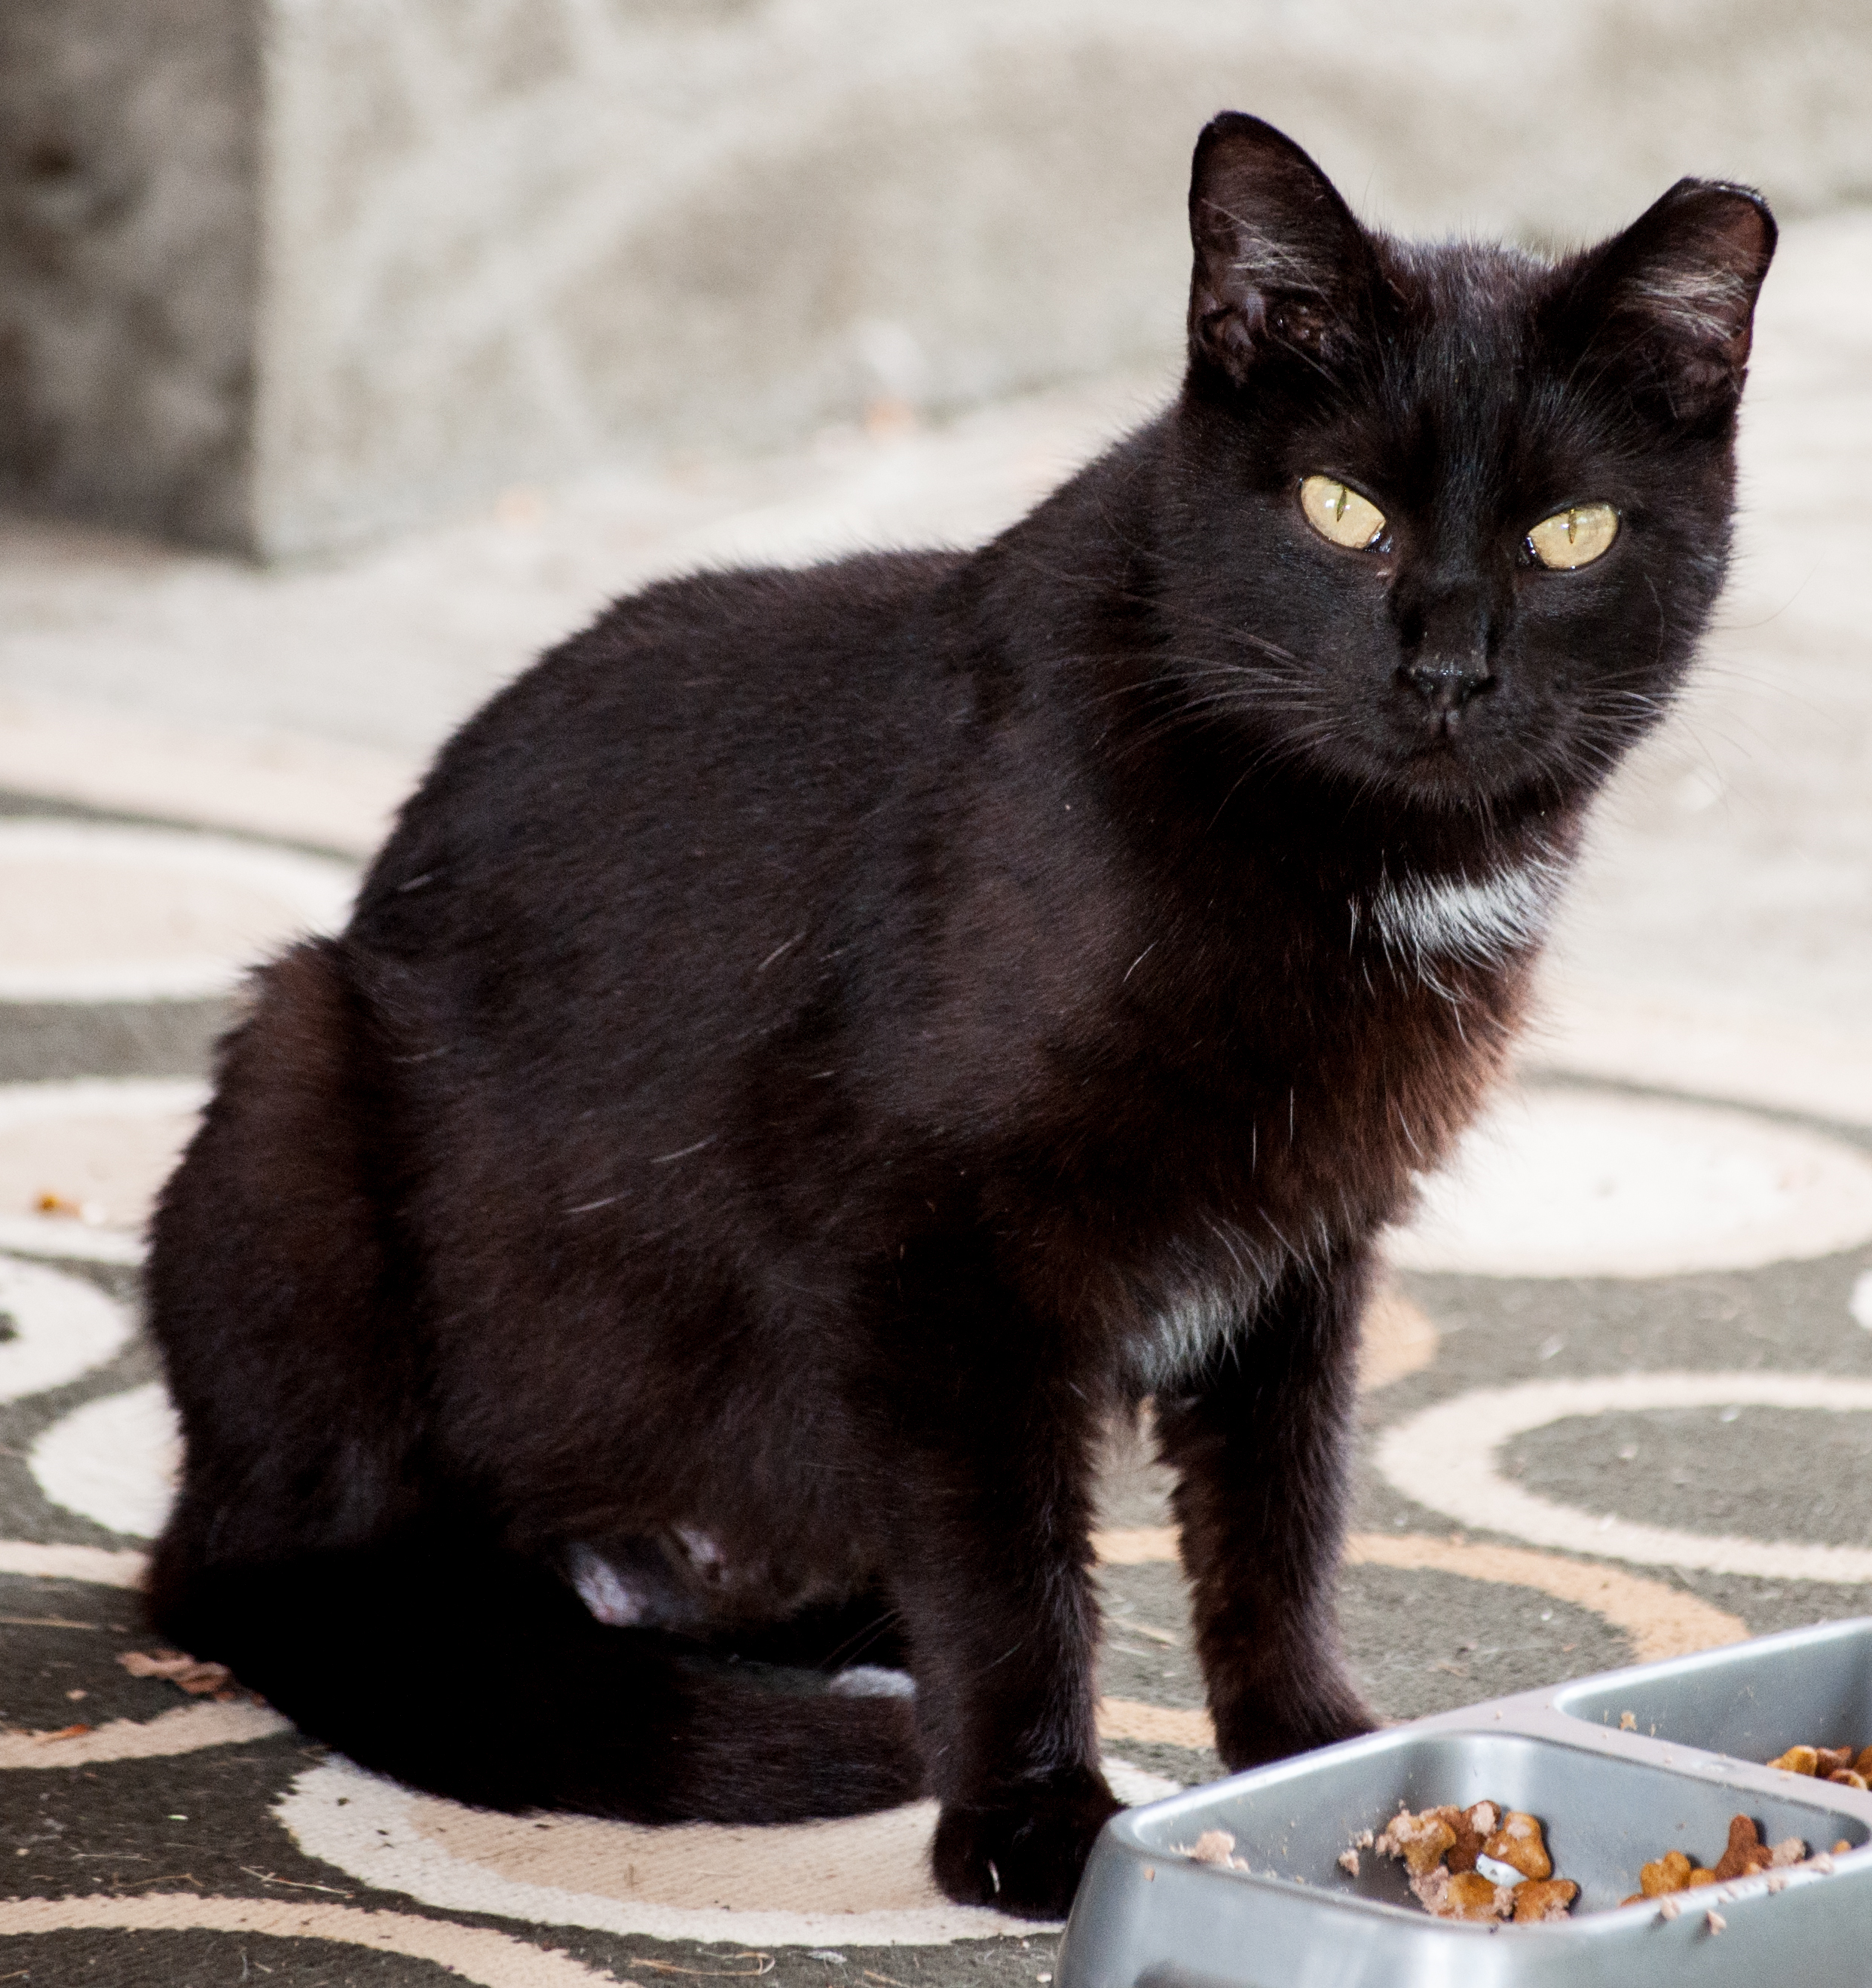
Last winter a very thin small black cat kept walking around our back yard. If you know one thing about me, I hope it is this. I cannot let an animal starve, and this animal was clearly there. We feed 2,000 pounds of corn to deer every year for the same reason. When I was a kid, my dad explained why we have to have deer hunters. He said if we did not, the herds would get too large and either the deer starve, get hit by cars, or are hunted to keep the population in check. I always thought there should be another option…so when Rich and I got married and bought a house that was backed by woodlands, we decided on what we’ll call “the new plan.” We found a farmer who sold us corn and every year, like clockwork, the day after Thanksgiving, we buy our “deer corn.” We’ve fed deer for over 30 years and are happy to do so. So when we saw this small starving feral black cat, we had to do something. My girlfriend gave us a cat house and filled it with straw.. Not hay, as it gets gross…Did I know that before, no, but now I guess I’m a cat lady. She/he used it a few times in really cold weather (we live in what’s called the snow belt, where we get a lot of snow, and it’s cold for up to 7 months a year.) We started buying cases of wet cat food and big bags of dry food for it. It wasn’t starving or freezing on our watch.
We didn’t want to name him/her as we didn’t want to bond with it, so we called him/her “Your Cat.” So if you came to visit us, we’d say “your cat’s outside” hoping someone would take him/her home with them.
Then later this spring, a large gray cat showed up, also starving, and we started feeding him as well. We knew he was a male because we saw him back up to a wall and pee. One afternoon, we saw him mount our little black cat and decided she was a female, but we’d have to wait to know for sure. Both cats were feral and wouldn’t let us near them, but over time the small black cat was getting closer and closer to Rich, his feeder. We’d been feeding her consistently for at least three months, and decided we should get him/her spayed. We have a local group called Hog Heaven Animal Rescue, where they spay and neuter cats, give them their shots, deworm them, give them a month’s flea and tick medicine, and cut their nails for $105, which is a bargain, all things considered. To trap a feral cat, you use a humane trap and put their food inside. They eat, you close the door and have to immediately cover the entire cage with a cloth, as cats will try to hard to escape, they can actually harm themselves.
Unfortunately, the very first day our little black cat let us pet her was also the day we had to trap her, and it was heartbreaking. We waited until she had finished eating before slowly closing the door, and then she went nuts, trying to break free. We couldn’t get the cover on it fast enough, as by then I was already crying from her panic and the need to escape. I thought people were making it up when they said cats will actually try to kill themselves to escape..I was mistaken. With the cover on the cage, she eventually calmed and we put her in our garage in a safe spot to be spayed the next morning. It was a bad week, as we had to euthanize our beautiful Bella, our almost 13 year old golden retriever the Friday before the cat’s surgery on Wednesday. I told Rich that if the cat turned out to be a girl, I was going to name it, but wouldn’t tell him the name. Bella was Rich’s dog in every way and I think in some way, Bella sent this little black cat for Rich to love and I wanted to honor that love.
Everything went well with the surgery, but when we went to pick her up, they said she tested positive for lactation, meaning, she had been nursing kittens. They asked had she gained weight, no…had she been missing for periods of time, no…well they’ve had false positives before so that must be what it is. They said keep her in a safe place for up to two days so she could heal and get the anesthesia out of her system, so we did. That was May 18th. On the 17th in the evening, we caught her, and then didn’t release her until May 20th. If she had kittens, which we truly believed she did not, they could never have survived for almost four days without her.
She forgave us for the surgery and subsequent jail time, and became more and more friendly, especially with Rich. She’d follow him around our back yard and rub his legs for attention, and nip him when he didn’t rub her as much as she desired. He never had a cat, so when a dead mole showed up on our back patio, he didn’t know it was his first gift of love from his new girl. I named her Ella after Bella and Rich calls her Ellie and is smitten with her, just like he was with Bella, which makes me so happy as he was devastated by her loss. Ella made Rich want to sit on the patio and rub her until she tired of him, and that didn’t happen often. She’d come to the top of the steps and look through the door’s window to see if he was coming out soon, and if he was bringing food, and boy can she eat. She never seemed to gain any weight, but was eating two full cans of cat food a day plus a lot of dry food and cat treats. We kept telling ourselves she was just wormed with her surgery, so she was finally gaining the nutrients she’d lost all this time from worms and a diet that wasn’t consistent before we started feeding her.
And then came Father’s Day. I was standing in our bedroom and Rich whisper/shouted for me to come to the sunroom as fast and quietly as possible. Of course I was too late. I said “what am I looking for?” He said “Kittens!” Our sweet little black cat brought Rich two little fuzzy black/gray babies and was so proud. We don’t know where she had kept them before now, but since this was now her home, she moved them to our covered patio behind a huge Rubbermaid storage bin and when we would sit on the patio, she’d call to them and they would come out to be with her. They are truly miracles, as they are still nursing and yet they lived for almost four days without her or any food while she was being spayed. We’ve only had them in our lives for a couple of days, but it seems like much longer, and now the process begins to find someone worthy of these two little miracles. Someone who will love them, keep them in their home and most importantly, spay or neuter them.
We had arranged to have the gray cat neutered as well, but he (like a lot of deadbeat dads) hit the road, and we haven’t seen him since making his neuter appointment. If he ever comes back for any length of time, we’ll definitely get him neutered as well. He’s not our priority though, Ella is. And to honor her and the sacrifices she’s made to keep her two miracles alive, we have to find someone to love them like we love their mother.
We haven’t celebrated Father’s Day since losing Rich’s dad a few years ago, but Ella knew exactly what Rich needed to start to heal from losing Bella, to fill his heart with new love, and for that, I can’t thank her enough.
You never know the difference a day can make, or a small black feral cat named Ella. Here are photos of Ella and her miracle babies.


Flip fold Graduation Cap Card
My great niece and nephew recently graduated from college and I wanted to use their school colors and mascots for their graduation cards.
This card is roughly based on one made by Sam Calcott in this video. https://www.youtube.com/watch?v=rC76AMrO_54
You can make this card a couple of different ways, but here’s how I made it. I started with two pieces of the same color cardstock cutting one piece to 5 x 7″ and another cut to 5 x 7 1/2″ and scored on the 7 1/2″ length at 7″. You’ll fold the score line and then put glue under the edge up to the scored area (or tear tape) to adhere this to the other cardstock. Don’t put them together yet.
On the 5 x 7″ cardstock on the 7″ length, make a pencil mark at 4 3/8″ and then turn it to the 5″ length and make a mark at 2 1/2″. Put this paper into your paper trimmer lining up the two marks (the 4 3/8″ and the 2 1/2″) and cut, then do the same with the other 4 3/8′ mark and the same 2 1/2″ mark to create a diamond. Lay the glued opening of the 5 x 7 1/2″ piece on your work surface with the card pointing up and then lay the 5″ flat edge of the other cardstock into the opening to create your card, then seal the 1/2″ flap to the other cardstock. You’ll need two pieces of school colored cardstock for the cap. The bottom piece is 3 1/2″ square and the top piece is 3 1/4″ square. I used a purple brad and a gold tassel I already had in my stash to poke through the center of the 3 1/4″ square purple piece, so I could attach it to the 3 1/2″ gold piece and not have the brad legs show underneath. If you don’t have a tassel, I show you how to make them in this video. https://www.youtube.com/watch?v=umLIttAuRbY I cut the length of the tassel string so the length of the tassel wouldn’t be too long for the card. I put the tassel knot I made through the two legs of the brad and then used my glue stick to make sure the ends of the string stayed under the top of the brad, then pushed the brad into the 3 1/4″ cardstock center, then put tear tape under the cardstock and adhered it to the 3 1/2″ piece of cardstock. I added some JMU logos I found online, as well as a graduation sentiment I got from some old Stampin’ Up rub on sentiments backed with gold paper. I put foam tape behind the logos and sentiment and adhered them to the card front to make sure they were not in the way of keeping the cap flat. I like using Avery Glue Sticks when glue sticks work best.
I FORGOT TO SHOW THIS IN THE VIDEO, but you need to score the front of the card at 4 3/8″ from top to bottom before adhering your cap. Then put glue only from the score to the end of the point and lay half of your cap directly over the point and it should fit perfectly. When I say I’m going to cut that off in the video, I’m talking about the back of the card and I cut it to 4 3/8″ wide. You could start by cutting the cardstock for the back of your card to 5″ x 4 7/8″ and score on the 4 7/8″ length at 1/2″ to end up with the same results I made in the end.
Inside the card I used a Hero Arts sentiment and die set called Congrats. I used some flatback gold pearls I bought on ebay link: https://tinyurl.com/ym5jem9r and glued them on the front of the card for some bling. I used a jewel picker and Tombow Mono Aqua glue to adhere them to the card.
The card fits in a 5 x 7″ envelope.
2nd TEMU Crafty Haul!
Below are links to the products I bought from Temu.com. I’m not affiliated with Temu, just like to share crafty bargains. The only product I didn’t like is the silicone mat that you use for wax melts, as I think the holes are way too big to be used for the wax stamps.
Temu.com
Small funnel: https://tinyurl.com/2p95zfme
Green hand holder, set of 10: https://tinyurl.com/yva4ewrn
Number dies: https://tinyurl.com/2s44v47s
You’re in my Thoughts die: https://tinyurl.com/2jnmjywh
Peach Ribbon: https://tinyurl.com/5apuy53h
Christmas birds stamp: https://tinyurl.com/bc8zeu2e
Large branch with leaves die: https://tinyurl.com/yhbbj6mb
Purple brush cleaning bowl: https://tinyurl.com/mw39bnwb
Pearls: https://tinyurl.com/bdd4kc87
Script 6×6″ embossing folder: https://tinyurl.com/2buufw8h
Baby Blue Large silicone craft mat: https://tinyurl.com/2sheday5
Silicone mat for hot wax melts stamping: https://tinyurl.com/3pa3m9vc
Floral ribbon: https://tinyurl.com/58nezx7b
DIY Die Storage in SU Cases or 3 Ring Zipped Binders
I wanted to create some die storage that would be easily accessible for dies I use often, which are mainly my sentiment dies.
Stampin’ Up Wood Stamp Empty Case- You need a specific kind of Stampin’ Up case, not the older ones that has the opening at the front of the case, the opening is in the middle. If you are looking for these, you can find them on ebay, here’s a link to one that has cases, https://tinyurl.com/8tsedxrd Here’s another single stamp and case: https://tinyurl.com/2jj8vft3
If you don’t want to buy a case like this, you can also use a zipped 3 ring binder. I buy mine at thrift stores and garage sales, but here’s some links to ones I found online. Amazon- https://tinyurl.com/yc5nzuuj and Ebay -https://tinyurl.com/mw7dm4pe
Magnetic vent covers: Amazon : https://tinyurl.com/ywde8b52 I checked Home Depot and their price is the same as Amazons.
Hole Punch- Most 3 ring binders require 1/4″ hole punches, but some can require a larger hole. I found a 10 mm hole punch that will work great. https://tinyurl.com/38cs6kdp You need a bigger hole punch when you are using the magnetic sheets, as you need to push a key ring through the magnetic sheets and they can be tricky if your holes are too small. You can try a smaller hole punch, but be prepared to go bigger for easier usage.
I liked the idea of using the Stampin’ Up case I had on hand because I could decorate the cover easily, by sliding papers under the plastic packaging. But even though I’ve seen people use Tim Holtz Idea-Ology ring binders, I couldn’t close my case once I put them inside. I’m not sure if it was because of the magnets I attached inside the case, but no matter what I did, I couldn’t close the case….until, I took the rings out from Tim Holtz, and instead used two individual rings that are 1″ or 1 1/4″ across…Dollar Tree sells them, link: https://www.dollartree.com/book-rings-in-assorted-sizes/188668
To cover the Stampin’ Up case, you’ll need three pieces of decorated papers, one for the end that’s 1 1/4″ by 7 1/8″ and two pieces for the front and back that are 5″ wide by 7 1/8″ tall. You’ll need to cut the magnetic sheets to 5″ wide by 7″ tall to fit in the case, and you’ll need a piece of heavy cardstock to layer between two magnetic sheets that is also 5 x 7″. I used tear tape to attach them to each other.
If you are using a 3 ring zipped binder, cut your magnetic sheets to 11″ long and leave them their normal width, which is 8″. You’ll cut your heavy weight cardstock to 8″ by 11″ to fit inside the zipped binder. Put tear tape on both sides of the cardstock to adhere the magnetic sheets to them and make the magnetic sheets more stable. The normal size of magnetic sheets are 8″ x 15″, so when you cut them to 11″ long, you’ll have 4″ of sheet leftover. Put these pieces together in a pile and then you can attach them to 8″ x 11″ cardstock and cut one of them from 4″ to 3″ so you can fit three pieces on one piece of cardstock butted up to each other like I did on the back of my case. You can find somewhere to use the 1″ leftovers as well.
When using a 2 or 3 ring binder, you’ll want to lay the magnetic sheet so it is centered top and bottom in the binder (after you’ve cut it to the length you need for your particular binder or stamp case) and make a mark with a pencil next to the rings, making sure the marks are long enough to push your punch in as far as it will go and still be able to see the marks through the hole of your punch. Punch the holes on one magnetic sheet, then use this as a template and lay it over the cardstock and draw a circle through the holes you punched and do the same for the rest of the magnetic sheets then adhere them with the white side of the sheet facing the cardstock and the black or dark gray side facing out.
If you’re using the Stampin’ Up cases, use the book rings you’d buy at Dollar Tree and decide where you want the holes. I suggest 2″ from the top and 2″ from the bottom and pushing your hole punch as far as you can so your holes aren’t close to the edge of the sheets. Once you’ve punched one magnetic sheet, use that as a template and laying it over the cardstock, mark where the holes are, and do the same with the other magnetic sheets. Once all of your papers and sheets are punched, put them together with the white sides of the magnets facing the cardstock and the dark gray side facing out. Open your rings and put the sheets in, close the rings, then lay your dies on the sheets. Whatever you use to hold your dies, make sure it has an enclosure for the entire surround, so you don’t lose any dies. It can be a zipper or a case, but it has to enclose the sheets entirely.
I wish my original plan had worked, but in the end, I was happy with using the rings from Dollar Tree and leaving the sheets loose in the case. I think I’d try the 1″ rings first, as they will stand up in the Stampin’ Up case vs the 1 1/4″ that I used that had to lay flat.
How to Use Edge and Ribbon Punches for Perfect Results
The punches I used were from EK Success: I don’t think any of these punches are still being made so I looked, and found them on Ebay.
Cupcake Ribbon Punch: https://tinyurl.com/4nrfdwnk
Open Scallop Punch: (I found this one that is similar, but I’m sure you can find this punch if you spend some time looking) https://tinyurl.com/3f4nxjn9
Lace Edger Punch: https://tinyurl.com/2acu9jxh (there are a lot of these on ebay and I found them under ek success scallop punch, and you’ll need to look at all of the images to find this. I gave you a link so you can see a good photo of one, not necessarily the lowest price.
When you are using a ribbon punch like the cupcake punch, you will have the best success if you use a longer piece of cardstock to cut your image, so you can lay it on your card and move the ribbon until the cupcakes you use cover the entire card front if you so choose. Unfortunately for me, I can’t punch a large image like the cupcake unless I put it on the floor and use my foot to punch it. I’ve never broken a punch doing this, and have done it for years. I don’t pound the punch, I just put enough pressure with my foot to make it punch.
I have only found that I can use EK Success/Stampin’ Up edge punches, as the other brands are too difficult for me to use.
I can normally punch the smaller edge punches with my wrists, but I guess today I’m not very strong. It could also have had something to do with punching on the silicone mat, that didn’t occur to me when I made the video.
The difference between an edge punch and a ribbon punch is this. Look on the underneath and you should see a gap between the bottom and top of the design and that will make a ribbon. A ribbon means the image will be free from the rest of your cardstock when you are finished punching it. If you only see a gap from the image to the top or bottom of the design (depending on if you have it upside down or right side up when you’re looking at it) then this will create an edge.
To make an border, you can turn your punch upside down and start your paper where your pattern begins, but that doesn’t ensure that your other end is a full image, so I believe the best way to ensure you have a complete pattern is to use a longer strip of card stock, maybe 7″ long if you want a 5 1/4 or 5 1/2″ image, and start either on the end, lining it up with the mark on your punch (if there is one), or start in the center and punch to one end, then punch to the other end. You always need to be sure that when you punch (after the first punch) that you line up the images you’ve punched on your cardstock with the images that are on the top of your punch to ensure you get a perfect cut.
Make sure you leave a portion of your design where you can’t see it so that you have a continuous punch, and don’t have parts that you accidentally skipped. If you do skip a section, put it back into the punch and line up the images as usual and you should be able to cut that piece without an issue.
When you are getting to the end of the cardstock, you’ll have a strip of paper that is loose at the top of the punch. Make sure when you are lining up your images to punch, that you keep that loose piece flat on the punch, otherwise your pattern will be wonky.
I hope this helped you to use your old punches. I know that a lot of us collected these and never used them, but they’re a great tool and easy to use once you practice a little bit.
TEMU Unboxing + Gifts from Janet
Below you’ll find links to the products I bought. I am not affiliated with TEMU, just thought you might like to get an idea of the craft things available and the quality of the things I purchased. Thanks Janet, for all of the lovely gifts..I will make great use of them. I will show you in another video how to make the projects Janet shared with me.
TEMU Purchases:
Thanks Die: https://tinyurl.com/mu2rvct5
Happy Birthday (wonky letters) Die: https://tinyurl.com/5n998fdu
Happy Birthday (carhop 50’s looking design) https://tinyurl.com/4wtmyv2a
Big Happy Birthday die: https://tinyurl.com/yk7yd6hu
12 Needles: https://tinyurl.com/2yz573db
Knife pen: https://tinyurl.com/2ze75ub3
120 vintage stickers (I show three sets of stickers when actually I only bought two, the other is Halloween: https://tinyurl.com/su7zb8hm
50 Halloween Stickers: https://tinyurl.com/2s3s5kwz
Diamond Painting diamond holder: https://tinyurl.com/3y2a7spk
Silicone desk craft mat with water holder: https://tinyurl.com/5a73dvkb
Boy Monster Birthday Gift Bag DIY
I made this gift bag for our great nephew Finn, and wanted to have a pocket to hold his card.
I went online and googled “free monster black and white printable” and found this image. https://www.pinterest.com/pin/644999977866117737/ I enlarged the image when using my printer and once it got to the size I liked, I printed it on 110 lb cardstock….then colored it with alcohol markers and cut it out with my Scan N Cut.
Bottom of Bag: 12 x 6″ score on the 6″ length at 1″ and 5″. Fold the sides up and burnish. This paper is from American Crafts on Amazon link: https://tinyurl.com/ypazx39f
Front and back of bag: papers came from Joanns Park Lane Floral Spice. 2 pieces of 12 x 12″ for front and back …For the back, I turned the paper so the stripes are now facing up and down, score at 3″ so the bag can lay flat. If you don’t care if it folds flat, you don’t need to make this score.
Sides: 2 sheets of 10″ x 6″ on the 6″ length of both, score them at 1″ and 5″ then turn to the 10″ length and score at 1″ and 3″ (I scored at 1″ then folded it up and scored at 2″ which is ultimately the same as scoring at 1 and 3″ without the fold, then put it on the 6″ side again with your scores at the bottom and score at 3″ down to the first score that should be 3″ from the bottom. Then you’ll want to score on an angle using a ruler from the top of the rectangular box near the bottom on an angle from the top center to the bottom left corner, then from the top center to the bottom right of the box. Fold your 6″ scores toward the white back of the paper then fold in the center fold and your angle scores. Angle cut out the small bottom corner boxes on the 1 and 5″ scores.
Pocket: 9 1/2″ x 6 1/2″ score on the 9 1/2″ length at 1/4, 1/2, 3/4″ on both ends and on the 6 1/2″ length score at 1″…Fold the 3/4″ score toward the white back, then the 1/2″ score toward the front, then 1/4″ toward the back and use your bone folder to make sure the scores are really flat. On the 1″ score cut out the bottom boxes on both corners.
Lid for pocket: 3 1/2″ x 8″ score on the 3 1/2″ length at 1″. I round the two corners that are the furthest from the 1″ score.Cut a small angle cut from the 1″ score to the edges of the 1″ on an angle. Adhere the pocket to the front of the bag (the one without the 3″ score) before putting the bag together, otherwise it will be too tricky to attach it. Take the pocket and put tear tape on the patterned piece that is laying flat that’s up to the 1/2″ score. Add glue to the patterned bottom fold for the pocket and fold it up then holding the sides and bottom, place it where you want on the bag. Glue the monster to the pocket at this point. (I couldn’t get my card to fit in the pocket with the lid to the pocket, but if you want to have your lid to work, put glue on the patterned side up to the 1″ score and place the 1″ scored area inside the pocket and rub it to keep it in place. Use Velcro closures to hold it closed.
To put the bag together, take the bottom of the bag and the sides and put glue on the bottom flap of the sides on the patterned side and lay the side down so the 10″ length is laying face down with its score lines lining up with the scores on the bottom then glue them together..do the same with the other side. Put glue on the front scored area of the bottom of your bag and attach the front of your bag to it (the piece without a 3″ score). Then do the same with the back. Once you’ve got the front and back attached to the bottom of the bag, glue the sides to the front and back of the bag.
Handles: four strips of 3/4″ x 12″ strips of plain paper, adhere them together by putting glue or tear tape on 1/2″ of one strip and laying it on the other strip to make a 23″ handle…you’ll need two of these. Hold the ends of one piece so it forms a half circle and glue in place. I glued my handles 2″ from each edge of the bag and down about 2″ (I used a line on my bag to decide where I wanted the handles to lay) I added a zig zag die cut to the bottoms so they looked more decorative. Also added the zig zag strip to the top of the pocket.
