
I contacted Scrapping for Less about their monthly card kits, and was offered to be a guest designer for their November, 2018 Banana Split kit.
Scrapping for Less offers two levels of monthly card kits:
Here is a link to the subscription information they provided for their two kits. https://scrappingforless.com/wp-content/uploads/sites/16/2018/03/Flavor-of-the-Month-Card-Kit-….pdf
Here are some frequently asked questions: https://scrappingforless.com/wp-content/uploads/sites/16/2018/03/Flavor-of-the-Month-FAQs.pdf
I was sent the Banana Split kit for November with a sophisticated and elegant theme.
Included in your kit will be four card layouts, as well as a list of the items you will be receiving in your kit.
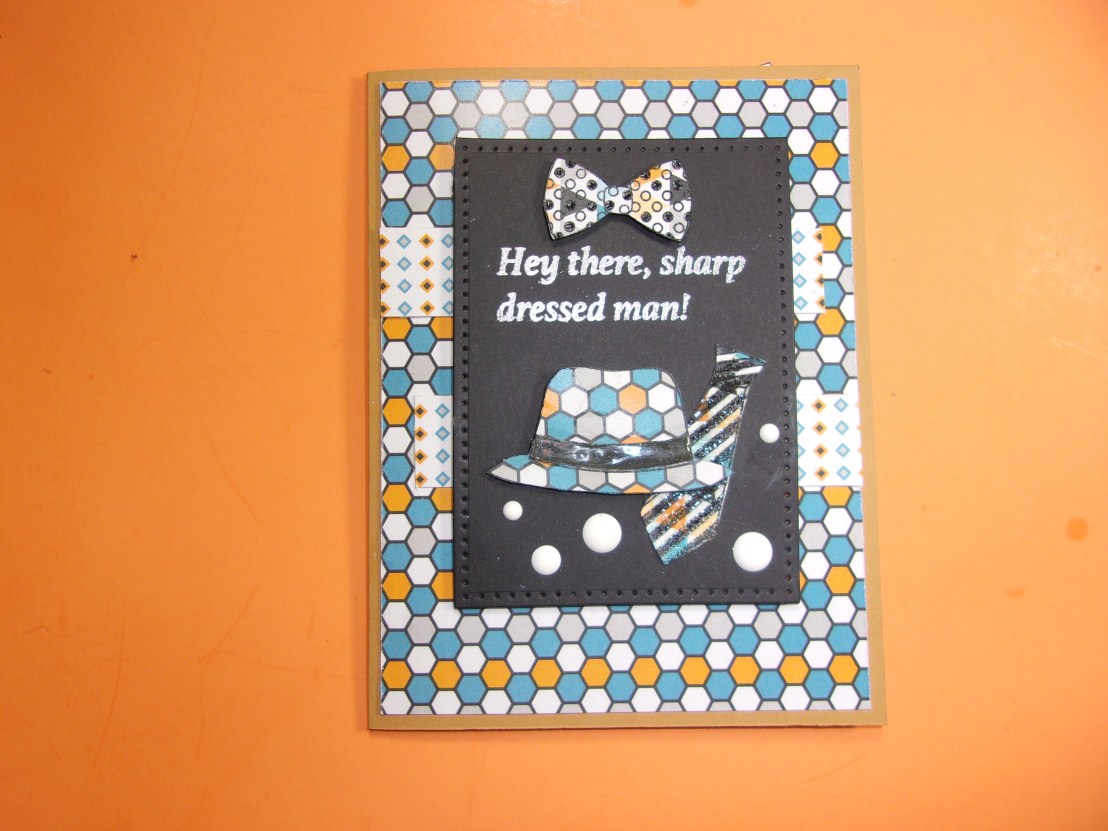
The first card I made was using the Dapper Man stamp set:
I started with one sheet of gold cardstock and cut it at 5 1/2″ on the 11″ length then scored it on the 8 1/2″ length at 4 1/4″ to create an A2 size card. I used a piece of cardstock that was half gray and half striped, and I cut two strips of the striped half, that were 3/4″ wide and used the all gray piece to cut a rectangle with a die. I used the hat, bow tie, and long tie stamps on one acrylic block, and stamped them several times on different card stock patterns (provided in the kit) and inked them with Versafine Onyx Black ink then added clear embossing powder and heat set them. I fussy cut all of the hats and ties, then stamped some hats on black card stock and gold card stock. I cut out only the band of the gold and black hats, then used an embossing marker and colored the bands then dipped them into clear embossing powder and heat set them. (If you don’t have an embossing marker, you can dip them into your Versamark glue), I glued these bands over the patterned hats I’d stamped, so the band would stand out(but still matched the colors in the hat.) Then I took a black water based marker and colored the stripes on the ties and the dots on the bow ties, and dipped them into clear embossing powder and heat set them.
I put the layout beside my card base, and glued a piece of matching cardstock that was 5 1/4″ tall by 4″ wide onto my card base. I used the strips that were 3/4″ wide by 3 3/4″ and glued one about 2″ from the top of the card on the left edge of our patterned paper, and glued the next strip about an inch lower, laying it on the right side of the patterned paper. I then took my rectangle of gray card stock and added the sharp dressed man sentiment to it with Versafine onyx black ink with clear embossing powder, and heat set it. I added the hat below the sentiment with foam squares under it, and the long tie to the right of the hat, overlapping the hat over the tie just a little bit. I added the bow tie above the sentiment and added some of the white enamel dots around the ties and hat.
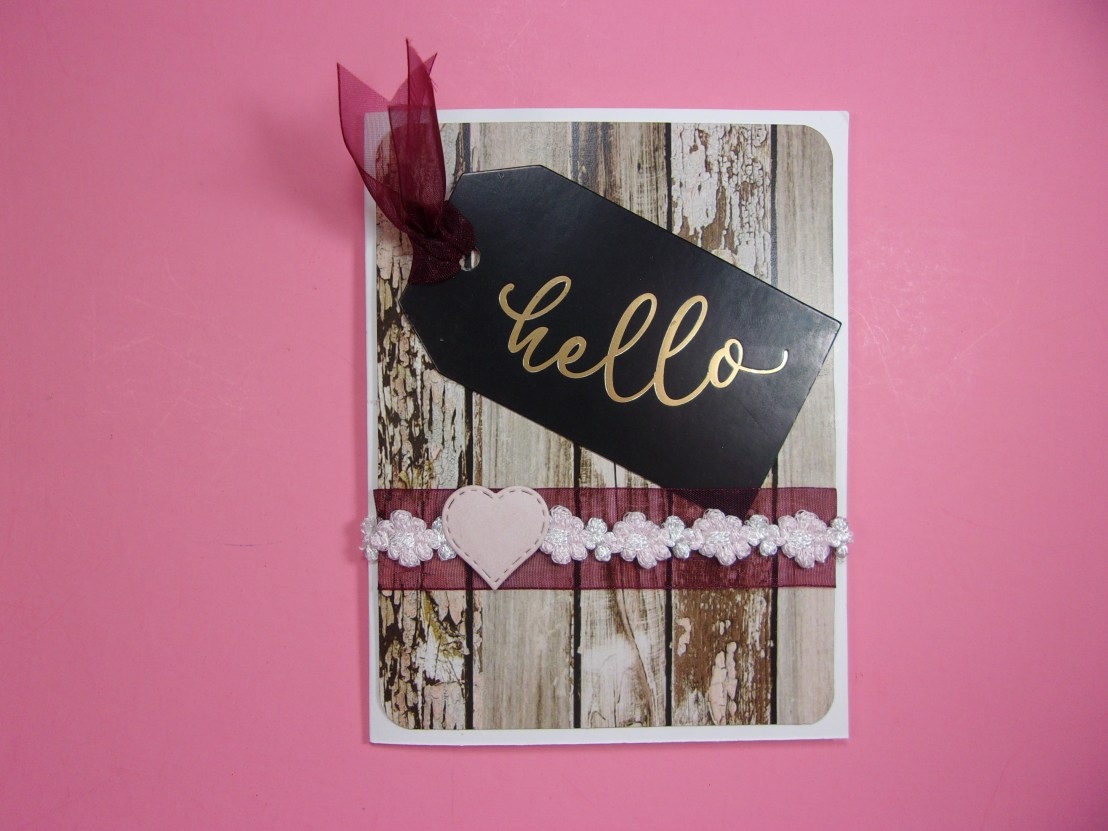
The second card I made with white Neenah paper included in the kit, and cut it to an A2 size card. I used the paneling paper and trimmed it to 4″ x 5 1/4″ then rounded the corners with my Kadumaro Pro corner rounder from Amazon. I tried to use the rounded rectangle in pink cardstock, but couldn’t get it to turn out the way I wanted it, so eliminated that portion of the layout. Instead, I layered a burgundy organza ribbon that was 1″ wide and put a 4″ length of pink and white floral ribbon centered over the burgundy ribbon. I had already glued the paper down before adhering the burgundy ribbon, so used my scissors and pushed the ends of the ribbon under the paper to glue the ribbon in place. I put the burgundy ribbon about 2″ from the bottom of the card with the white and pink floral ribbon centered on the burgundy ribbon. I used a tag that came with the kit that said “Hello” and pulled a loop of the burgundy ribbon through the hole on the tag and then pulled the ends of the ribbon through the loop and pulled them tight. I trimmed the ends like a whale’s tail by folding the ribbon in half and cutting from the center toward the ends of the ribbon to create a diagonal cut that once unfolded, creates the look of a “V”. I glued the Hello tag down with a glue stick and used Beacon’s Fabri Fix to glue the floral ribbon to the burgundy ribbon. I stamped the inside of the card with “You are so beautiful” from the stamp set provided and inked it with Stampin’ Up’s Pretty in Pink ink. I used the pink paper provided, and a heart die, and cut a heart then attached it to the left side of the floral ribbon on the front of the card with the Beacon Fabri Fix glue. I stamped the back with “Made by Sandy Parker” stamp that I had made by Stampanda.com.
For the third card, I wanted to make a 5 x 7″ card with the little girl stamp made by Santoro. I started with pink card stock cut to 10″ by 7″ and scored on the 10″ side at 5″, to make a 5 x 7″ card. To follow the layout, I needed to use three dies. I used a square die that was the same size top to bottom as the inner oval die I was using. Then I used another oval die that was about 1/2″ taller than the first die. I wanted to use them to create a frame, since I didn’t have an oval scalloped die like was shown on the card layout. The first thing I did was cut out different papers with the dies. I used a black floral image to cut the ovals, and made sure they were well spaced from each other, then taped them together to ensure when they went through the die cutting machine, they would stay even with each other. I took the center of the oval and used my “Sparkle” die (that came with the kit) and cut it out on the die cutter. (You need to keep all of the small pieces that fall out of the letters.) I took my oval and put a piece of scotch tape on the back and laid the word Sparkle in black foam into the opening created by the die cut. I then laid the small pieces back into the sparkle that fell out of the letters. I decided I wanted a black card stock over the foam, so cut it out with the die, and glued it over the foam….I used a Spectrum Noir glitter pen to add sparkle to the word sparkle. I took this oval and glued it in the inside of the card and added a sentiment from Ellen Essentials stamp set called Sparkle (that was not included in the set) that said “You make my life” stamped in black ink on pink cardstock and laid this right above the word Sparkle.
The square die I cut with another patterned paper and set it aside. I wanted to use a black and white patterned paper for my background, but I only had 6 x 6″ paper packs….so I took the 6″ long paper and cut it to 4 3/4″ wide and then cut it in half at 3″. I used a piece of cardstock with shoes and purses on it, and glued it to a pink piece of paper that was 1″ tall by 4 3/4″ wide, then laid the 3″ black and white pieces next to a ruler, so I could lay one piece at zero and the other piece to stop at 6 3/4″ so there’s a gap between the two papers. I used a glue pen and glued the edges of the center of the black and white papers and then laid the strip I’d created with pink paper over that gap and glued it down. Then glued the shoe paper into the center of the pink paper (this strip was 4 3/4″ wide). This allowed me to turn a 6″ piece of cardstock into a 6 3/4″ tall piece. I then glued this piece to our 5 x 7″ cardstock. I took a piece of the white Neenah cardstock and used the smaller oval die to cut it out. I stamped #53 Sugar and Spice Santoro girl stamp with Simon Says Stamp ink (as it works well with alcohol markers.) I used some Spectrum Noir markers and a bunch of Touch Five alcohol markers to color the Sugar and Spice doll. I added some Reminsce white gel pen that was provided in the set to make lines in her skirt and decided to put her on foam squares on the front of the card. I took the pink square that I had die cut and went around the edges with Walnut Stain Distress Oxide ink and also went around the edges of the oval of our stamped doll with the same ink to make it look more cohesive next to the brown oval. I glued the square into the center of the card, then laid the doll centered over the square, then glued the oval frame around her with a glue stick. There were pink rhinestones included in the set, and I used an alcohol marker to color over them to make them match the colors in the card better, then glued the rhinestones around the doll and in the squares of the background paper. I added Spectrum Noir glitter pen to her hair and over the “sparkle” on the inside of the card. I cut out a sentiment strip that said “Life is a party” and added that to the right side of the front of the card near the top… That finishes our third card.
I stamped the back with my Stampanda stamp and went on to our fourth card.

Our fourth card is simple, and involves the lady with the butterfly skirt stamp called “What if I fly”…. This is an A2 size card with a white card base. I used one of the papers from DCWV that was floral filigreed and I cut it to 4 1/8″ x 5 3/8″ and glued it to my white card base. Then I took a strip of the black glitter paper and cut it to 4 1/8″ wide by 1 1/2″ and glued it over the paper at the very top of the card. Then took silvery paper that is 4 1/8″ wide by 1″ tall and glued it directly beneath the black glitter paper. Then I took black glitter paper again and cut it 1 1/4″ tall on the left side and 1/2″ on the right side. I drew the marks on the back of the paper and used my paper trimmer to cut it out. I then took another piece of the silvery paper that was 2″ by 1 1/2″ and then outlined it with black glittery paper by holding the black paper under the silver paper and trimming about a 1/8” border around it. I cut a “V” in the bottom of the black paper and cut it out of the silver paper by holding it (again) about 1/8″ away from the bottom edge.
I had cut a circle out that was large enough to hold the lady with the butterfly skirt, and stamped her with Versafine Onyx Black Ink and then heat set it with clear embossing powder. I also stamped some of the butterflies that were included in the set and put clear embossing powder over them as well. I added black foam to the back of the circle die cut and glued it together with a glue stick, then glued the circle to the front of the card on the silver strip toward the top of the card. I stamped the sentiment from the set inside the card.

Here’s the link that will take you to the blog hop…Hope you enjoy all of the terrific cards these ladies made:
This link will take you to my video:
