Category: Uncategorized

Making Drawers for Prismacolor Pencils (Dresser in Next Video)

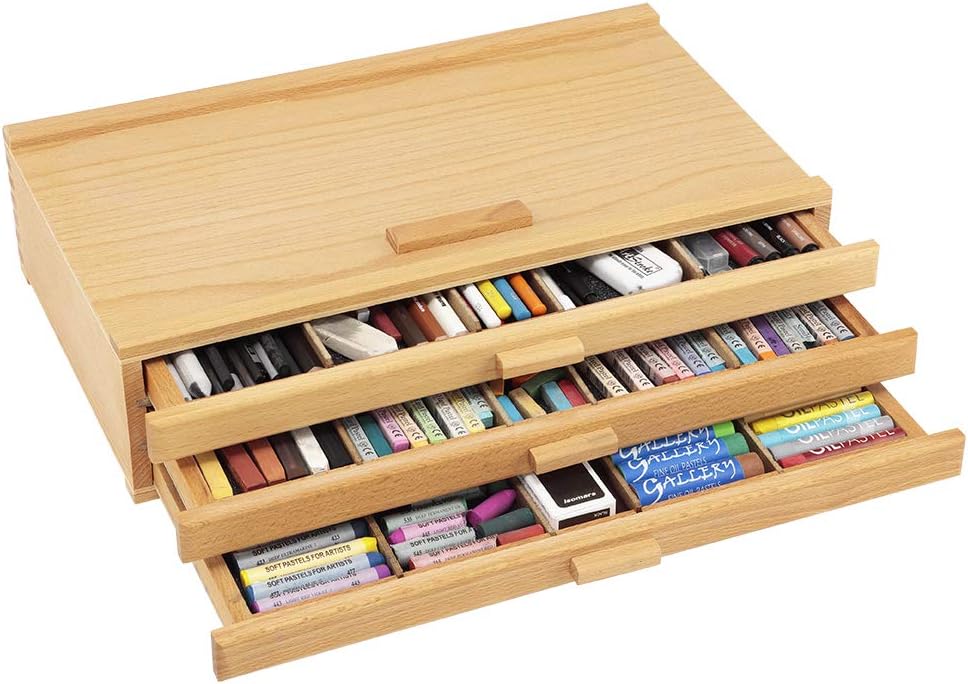
I wanted to make a five drawer storage unit for my Prismacolor pencils and thought I’d show you how I made it. This is the first video and the second video will show making the cabinet to hold the drawers.

I made five drawers and in this video, I’ll show you how to make one and then you’ll repeat this process four more times.

NOTE: THIS IS CRUCIAL. WRITE ON THE CARDBOARD, SIDE, SIDE, FRONT, BACK, AS THIS IS SO IMPORTANT TO MAKE SURE THE BOX TURNS OUT PERFECTLY. AND MAKE SURE UNTIL THEY’RE GLUED IN PLACE, THAT YOU CAN ALWAYS READ WHAT YOU WROTE ONCE YOU COVER THE TOP WITH CARDSTOCK.

You’ll need a medium weight cardboard/chipboard. I bought mine on Amazon and here’s the link to it. https://tinyurl.com/yhtu5ptv I do recommend you price shop when buying anything I provide a link for, as I want you to pay the lowest price possible.

You’ll need: Beacon 3 in 1 Glue or Colall Glue works best to make this project.

Cardboard needs to be 2 mm thick to work with the measurements I’ll be using.

You’ll need eight hinges that are 1 1/2″ tall x 2″ wide score on the 2″ length at 1″ made out of a lighter weight cardstock. Don’t use heavy weight cardstock as it won’t work well...

Two pieces of chipboard/cardboard that are 1 1/2″ tall by 7 1/4″ long for the sides

Two pieces of 2″ x 7 1/4″ cardstock scored at 1″ on the 2″ length, and you wrap one over the top of your side pieces and glue it in place as this makes the box more sturdy.

Two pieces of chipboard/cardboard that are 1 1/2″ tall by 7 3/8″ long for the front and back

Two pieces of cardstock that are 2″ tall by 7 3/8″ long for the front and back scored on the 2″ length at 1″. You’ll wrap one piece over the top of the front and back pieces

Putting the drawer together:

Start with the back piece and one side piece that already have their cardstock glued on the top. You’ll put the side piece so it’s butting onto the back piece at one end, then take one of your hinges that are 1 1/2″ x 2″ and glue it behind the back and side corner and another hinge that you’ll glue to the front of the side and back piece of cardboard to hold them in place. Take the other side piece and glue it to the other end of the back piece, making sure it’s glued onto the back piece, (and not beside it) then put a hinge behind and in front of the intersection of the side and back pieces to hold them together.

Eight pieces of cardstock that are 1 1/2″ tall by 7 1/4″ .scored on the 1 1/2″ length at 3/4″. You’ll need three pieces initially, and you’ll only put glue one one side of the score (so you’re gluing the entire length 7 1/4″ but only on 3/4″.) Take the first piece and glue it on the bottom back of your back piece, then glue one to the back of each of your sides so the extra flap lays inside the box you’re making. Once all three are in place, take your bottom that is 7 1/4″ x 7 1/4″ and glue it onto all of the flaps. It should fit perfectly. Take the next three of the 7 1/4″ x 1 1/2″ cardstock pieces and glue them inside the box on the two sides and the back. Take another of these cardstock pieces and glue it inside the front of the box lining the center up with the edge of the box, so our front has something to be glued to. Take your front cardboard piece that is 2″ x 7 3/8″ (with cardstock wrapped around the top) and glue it to the flap you just put in and making sure the two side cardboard pieces are glued to the ends of the front piece. Add two of your 2″ x 1 1/2″ hinges to the ends on the inside of the box and on the outside of the box. Add one of the 7 1/4″ x 1 1/2″ cardstock pieces under the front of the box glued to the bottom.

I used Chipped Sapphire Distress Ink that matched the decorated paper I used and went around all of the edges, top, bottom, sides, so the box matches the cardstock I cover it with.

I used PVA Glue link: https://tinyurl.com/3pxpm9f5 and a silicone tool I bought at the Dollar Tree in the makeup aisle to glue down the decorated cardstock. I cut decorated paper to 7 1/8 x 7 1/8″ to line the inside of the box.

I added a strip of cardboard for the center of the box that’s 7 3/8 x 1 3/8″ wrapped with matching cardstock. I lined the sides of the inside of the box that are 7 1/4″ x 1 1/2″ tall glued on each side and did the same to the outside of the box. I hot glued the center cardboard strip into the center of the box from front to back. If it bows the box, cut a small strip off before gluing it in place. For the outside of the box, it was a lot easier to use 1 1/2″ x 12″ long strips that I PVA glued and wrapped around the box. You want the pattern to be perfect on the front of the box, so make sure it doesn’t have a seam on the front.

GBFKE com Haul and Giveaway

Thanks to the nice people at GBFKE.com for sending me these products.

To enter the drawing, you must live in the USA. In the comments below the video please write, “I’d like to win the peacock.” I’ll choose a winner on April 15th and will contact the winner for their address. If I don’t hear back from the winner by midnight of April 18th, I’ll pick a new winner. Winning comment is chosen at random.

http://www.GBFKE.COM

Products Shown:

Butterfly lamp: https://gbfke.com/products/butterfly-diy-diamond-painting-led-light-embroidery-night-lamp-home-decor377972?_pos=1&_sid=ef201b18a&_ss=r

Flower diamond painting: https://gbfke.com/products/colorful-flowers-30x40cmcanvas-partial-special-shaped-drill-diamond-painting458781-02?_pos=1&_sid=33c427db2&_ss=r

Christmas Truck diamond painting: This painting is not currently available, but here’s a painting that is very similar. https://gbfke.com/products/christmas-car-manual-gift-full-round-drill-diamond-painting-40-30cmcanvas453928?_pos=2&_sid=34b562d22&_ss=r

Peacock Diamond Painting: https://gbfke.com/products/bird-partial-special-shaped-drill-diamond-painting-30-40cmcanvas455177-08?_pos=2&_sid=143c9305d&_ss=r

Puppy Diamond Painting: https://gbfke.com/products/5d-diy-special-shaped-diamond-painting-cross-stitch-embroidery-h100-dog308051-02?_pos=2&_sid=a0a293416&_ss=r

Gnome Christmas Diamond Painting: https://gbfke.com/products/goblin-christmas-30-40cmcanvas-full-round-drill-diamond-painting460897-02?_pos=1&_sid=195027e08&_ss=r

Making a 12×12 Gift Bag

I’ve been watching Sam Calcott on Mixed Up Craft making gift bags. I really liked the size of this bag, and hope you do too. Here’s the link to the video Sam made: https://www.youtube.com/watch?v=1GoGxcQqilQ

You’ll need:

Two pieces of 12 x 12 scrapbook paper (front and back)

two pieces 8 x 12″ scrapbook paper (sides)

one piece 8 x 12″ scrapbook paper (bottom)

two pieces of 6 x 2″ wide cardstock (hinges to hold the bag together)

decorations for bag–I used a cut out from one of the paper pads, plus three tassels I made in a previous video

wet glue: I used Brutus Monroe’s wet glue that he no longer sells and I used tear tape.

Scoring:

6 x 2″ pieces…score both on the 2″ length at 1″

bottom 8 x 12″ piece–score on the 8″ length at 1″ and 7″ sides

8 x 12″ pieces–score on 8″ length at 1″ and 7″ and on the 12″ length, score at 3″ (this needs to be at the bottom of the bag, so make sure your pattern faces up, away from the 3″ score) then put the paper back to 8″ length and score at 4″ down to the 3″ line near the bottom of the paper. Score both papers the same. Put the score board aside and on the 8″ length, go to the 4″ score, where it intersects with the 3″ score at the bottom..Using a ruler and scoring tool, put the ruler from the 4″ and score diagonally to the 1″ score on the left and then to the same from the 4″ center score to the 7″ score on the right.

Fold all of the score lines on all papers.

Note: If your paper tends to crack, put Scotch tape (cello tape) on those score lines that could crack on the inside of the bag..

12 x 12″ back of bag—score directional patterned paper with the top of the pattern facing to the right side of the score board…score at 3″ if you want to flatten the bag…if you don’t want to flatten your bag, you don’t need to do this score.

Fiskars bone folder is no longer made, but I found them on ebay: https://tinyurl.com/y39hsxmd

To put the bag together: Start with the bottom that is 8 x 12″ (Add tear tape to the outside of the 1″ and 7″ scores) and the two 6 x 2″ hinges. Glue the hinges with the center fold lined up on the short edges of the bottom. I used tear tape and Brutus Monroe’s wet glue on one side of a hinge and folded the hinge closed with the open part facing the inside of the bag. (You want it to stand up with the other flap lined up with the edge of the bottom of the bag.) Put tear tape on the other flap of the hinges, but don’t take the backing off. Lay the other hinge on the other end of the bottom of the bag so you have four 1″ flaps sticking up (the other two are the scores you made to the bottom of the bag.) Take the backing off the tear tape on the long sides of the bottom and add wet glue. Try to flatten the 1″ score line and line up the bottom edge of the front (the one without a score) of the bag and make sure the 12 x 12″ paper is lined up with the bottom edge of the bag. Do the same on the other side with the back of the bag, making sure the 3″ score line is near the bottom of the bag. Take one side of the bag and take the backing off the tear tape on the bottom side 1″ strip of the bag (the side is the short 8″ length).. Add wet glue then lay the bottom of one side onto the bottom on it’s 1″ strip and take the backing off the 1″ side flap ( tear tape,) add wet glue, then holding the bag as tall as possible, pull the front and side up as straight as possible and adhere the top of the flap together then work your way down, making sure it’s well adhered. Using your bone folder, rub inside the bag on all of the adhered flaps, to ensure it stays connected. Then do the same to the other side of the bag, adhering the side to the front. Then adhere the back to the sides using the same techniques as you did on the front panel.

I took a ATG card from the paper pad and rounded the corners with my Kadomaru Pro corner rounder link: https://tinyurl.com/3aw4vy2m

For handles, make a pencil mark from the right and left sides 4″ and 1″ from the top, then poke a hole in these spots all the way through to the other side with a pokey tool or by using a Crop a dile Big bite, link: https://tinyurl.com/a4653cz8 and put the setting on the top to 3/8″ to punch the holes through both sides on the marks I made. You’ll need four eyelets, and put the Big Bite inside the bag, and move the lever so it does eyelets and crunch the eyelets in place. I used a silver ribbon and ran it through a hair straightener to get all kinks out and then cut a length that’s 17″ long and ran it from inside the bag to outside and made a big knot inside the bag to hold it in place then push the ribbon inside the other hole on the same side and knot. Do the same on the other side. Add tassels and the ATG card onto silver ribbon, then tie them onto the bag.

Here’s a photo of the bag I made.

How to Use Dies Without Cutting Them Apart: An Easter Card

I wanted to use a bunch of dies that came attached together, but didn’t want to cut them apart.

I used white cardstock so I could color the pieces I wanted. I made another card where I colored the bunny grey, and on this card, left the rabbit grey, but colored his ears, nose, and glass inserts.

I was sent these dies from a friend who didn’t know where they were made. I found them on Amazon link: https://tinyurl.com/rsuw55yc and Aliexpress link: https://tinyurl.com/sanf95ye

I die cut the entire set of dies and then used pink markers to color the ears and nose. I die cut an additional set of eyeglasses out of blue glitter cardstock, then removed the heart centers and used the white original set of hearts and colored them black, then used a black Wink of Stella style pen link: https://tinyurl.com/26w96dj3 to color the hearts so they are sparkly.

I used a card base that is 5 1/2″ tall by 8 1/2″ wide, scored on the 8 1/2″ length at 4 1/4″ to make an A2 sized card. I took a piece of light blue cardstock that was 4 1/4″ wide and 3″ tall and ran it through my Vagabond II link: https://tinyurl.com/y8pbe4km inside a Brutus Monroe embossing folder called Petal Lace link: https://tinyurl.com/56nb72dh. Then I used Hero Arts Unicorn White pigment ink link: https://tinyurl.com/a9u78an6 and lightly rubbed the ink pad flat across the blue paper to create a white embossed design on blue paper. I had leftover strips of floral scrap paper that I cut to 2″ tall x 4 1/4″ wide and glued this to the bottom of the front of the card base. I used an Avery Glue Stick to adhere the blue embossed paper above the floral scrap. Then I took a piece of retired Stampin’ Up pleated Blushing Bride ribbon link: https://tinyurl.com/57u5z7me and attached it to the top of the floral scrap on the blue paper with tear tape, then using Glue Dots, adhered the rabbit’s paws on the ribbon. I glued the rabbit head down before attaching the paws, as I wanted the paws to be on either side of the head (but below it on the ribbon)..Then I glued the nose, glasses and pinks of the ears to the rabbit head. I had a die that cuts “Happy Easter” and used a dark burgundy scrap of cardstock to cut it out and then adhered it to the top of the card on an angle using Tonic Precision Glue Pen link: https://tinyurl.com/y76adbjb

How to Make Paper Tassels

I wanted to make paper tassels with minimal tools and made two versions..

Version One: Fringe Scissors (Sorry, I call them grass making scissors)

Uses fringe making scissors link: https://tinyurl.com/wrstrxxs Take a strip of 7″ long x 2 1/2″ wide cardstock that is no thicker than 90 lb cardstock. Using the scissors cut to about 1/2″ from the top of the 2 1/2″ width and cut the entire length of cardstock. Then roll the cardstock around a dowel or skewer to start the small center of the tassel, then continue wrapping the cardstock around the dowel/skewer link: https://tinyurl.com/dxfah742 and make sure the paper is straight across the top. I put my finger over the top to ensure the paper is flat on top. I also add tear tape on the inside top 1/2″ of paper so it stays adhered as you roll it. Put tear tape or glue on the end once you’ve wrapped all of the paper, to make sure it stays put. Then take tear tape and wrap it around the uncut top section of the tassel, centering it on the uncut section. Take the backing off the tear tape and run a strip of ribbon around the top of the tassel. Then take a 5″ strip of the same ribbon and snip the ends in a “v” shape and put wet glue (I used Brutus Monroe glue that they no longer sell in the bottle I used) into the center hole of the tassel, then with a sharp object like a pokey tool or scissors, push the end of the ribbon into the hole and push it in until you’re sure it’s really in there, then do the same to the other end, making sure it’s in the hole, then add more wet glue in the hole and around the hole so the tassel stays well adhered, as does the ribbon. I recommend that you fluff the bottoms (pull them apart) so they look more realistic.

Version Two: Normal Scissors

Using normal scissors, I used Tim Holtz 5″ snips link: https://tinyurl.com/5xj29z3w and cut small strips maybe 1/16″ apart on 7″ long by 2 1/2″ tall cardstock that is lighter weight. Make 2″ snips the entire length of the paper. I wrapped the paper around a skewer and then laid a piece of tear on the top 1/2″ length that’s not cut, and held the paper tightly as I wrap it around until I’ve wrapped the entire length of 7″ paper. Once you finish wrapping the paper, put tear tape under the end to hold the tassel in place. Then take a piece of 1/4″ wide tear tape and wrap it around the outside of the tassel centering it on the top section, then take the backing off, and run a ribbon around the top section of the tassel. Then take a 5″ strip of the same ribbon and snip the ends in a “v” shape and put wet glue into the center hole of the tassel, then with a sharp object like a pokey tool or scissors, push the end of the ribbon into the hole and push it in until you’re sure it’s really in there, then do the same to the other end, making sure it’s in the hole, then add more wet glue in the hole and around the hole so the tassel stays well adhered, as does the ribbon. I also recommend that you fluff the bottoms (pull them carefully apart) so it looks more realistic.

How to Make a Bunny Bag for Easter Goodies Using Two Methods for the Bag

I made two different bags, one premade and the other, I made from cardstock.

Using a Pre-made Bag: I saw a similar bag on MaymayMadeit.com, link: https://www.youtube.com/watch?v=3LkRzk5GR2k that I played with, to make it unique.

Take a lunch bag (white if you want to make a white rabbit) and then fold the top down under the gusset on the back of the bag.

For the Body: I used a 4 1/2″ wide circle die and cut a circle, then cut about an inch straight across the bottom of the circle to create a flat bottom to the circle, using Fiskars Guillotine Trimmer link: https://tinyurl.com/4yyuu3x3

Changes I made on this bunny from face decorations below:

Eyes: two white 1″ circles distress edges w/ gray ink (I used Stampin Up Going Gray ink, but you can also use Smoky Slate link: https://www.stampinup.com/products/classic-stampin-pad-smoky-slate as Going Gray is no longer available, unless you shop on ebay. I used a Tim Holtz Blending Tool link: https://tinyurl.com/54mfbt9m to add ink to the edges. Use two, 3/8″ black circles for eyeballs. Use a white gel pen to make two dashes and a dot in the blacks of the eyes for the pupils.

Cheeks: 2 white oval 1 1/2″ long oval dies, overlapping by about 1/4″ in the center. I distressed the centers of the cheeks with Distress Ink Spun Sugar

Feet: two 2″ white punched circles and 1″ pink circle centers plus 8 pink 1/4″ circles from circle punch (I didn’t have that size circle punch, so used my Crop a Dile Big Bite (link below under toes) on the 3/16″ punch to create my pink toes. I distressed around the edges of white pieces with gray ink and pink edges were distressed with Spun Sugar Distress Ink.

Whiskers: I used the fringe making scissors link: tinyurl.com/4z78643z and made one snip as long as I could make the snip, and then cut these out with a triangle of paper so they would stick together. I spread apart the whiskers so they look more natural, then did the same thing again for the other set of whiskers.

Ears: Two 2″ scalloped oval paper punch pink for centers and 2 white 2 1/2″ oval punched ears (I did have to cut the sides down as they were too wide.)

Bow Tie: I made a bow tie for him using the 3 d bow video I just uploaded. link: https://www.youtube.com/watch?v=KRpx3W29M6Q

I made a belly band that is 12″ long and 1″ wide and wrapped it around the bag with about 1/8″ gap so the band will slide on and off and the band would hold the bag shut then used wet glue to hold it together. I glued the ears onto the belly band with about 3/4″ below the belly band.

I adhered the face in one piece, as I glued the cheeks together overlapping each other, and the eyes, glued overlapping each other glued a little underneath the cheeks. I put thick foam tape beneath the face so the belly band will slide under the face a little bit. Make sure the foam tape isn’t under the eyes, so the belly band will slide further under the face than mine did.

Making our own Bag: I saw a similar bag on Mixed Up Craft link :https://www.youtube.com/watch?v=R_ejsIiNfyU. I used the bag Sam made as a template and then decorated to make it unique.

Using a 12 x 12 white cardstock link :https://tinyurl.com/ayk8nxzv , scored on one side at 1 1/2″ and 8″ then turn the paper once in your scoreboard, and score at 4 3/8″, 5 7/8″, 10 1/4″, and 11 3/4″. Fold and burnish the scores. With the 11 3/4″ score on your left, cut out the scores all the way to the 4 3/8″ score, so all you have left on the top of your bag is one square. I used the Kadomaru Pro link: https://tinyurl.com/ww5rhu4b to round the corners on the top of the square left behind. With the 11 3/4″ score on your left side (I often call this the 1/4″ score), Cut the 11 3/4″ score away, up to the first score line, which should be 1 1/2″. On the next score line, (10 1/4″ score if you flipped the paper over) cut up to the 1 1/2″ score line, then move to the 5 7/8″ score and cut up to the 1 1/2″ score, then do the same on the 4 3/8″ score. NOTE: If you turn the paper over, you’d more easily find them with a ruler to cut them. Make sure you cut out the score lines when you do this. Then cut each one of the cuts you just made, with an angled edge so they’re easier to fold into the bag. Fold in the 1/4″ score line on the left, and cut an angled edge to the very top (the same side as the big box you left behind) of the 1/4″ score. After folding in the 1/4″ score, put tear tape to the score and remove backing, then fold the section with the big square at the top over onto the 1/4″ score and the bag is made.

To close the bottom, lay one long flap down, then put glue on the inside of the two small flaps and lay them onto the long flap you just closed, then put wet glue (I used Brutus Monroe’s wet glue, they changed their packaging, link: https://tinyurl.com/35hr3hut, then add glue to the remaining long flap, and close the bottom. Use a ruler inside the bag to push the bottom down so it stays glued.

For a closure: Put self adhesive velcro link: https://tinyurl.com/5v9kxc7z (both pieces together) on the center of back of the top flap, then close the flap, making sure the velcro attaches to the top and keeps the bag closed.

For the body: Take one of the 4 `1/2″ circles you die cut and lay it on the bag under the flap, up to the velcro piece (but not covering it) and make a mark on the circle where it touches the bottom edge of the bag, then trim the circle off. Once trimmed, distress the edges. I used a Tim Holtz Blending Tool & Stampin’ Up Going Gray ink for this, then glue the circle onto the bag with the straight part of the circle lined up with the bottom edge of the bag.

Feet: two white ovals used 1 1/2″ oval die. Distress edges w/ gray ink

Toes: 8 Pink 1/4″ circles (didn’t have a punch so used my Crop a dile big bite on the 3/16″ mark link:https://tinyurl.com/yy2ptbms) and 2 pink 1″ circles for ball of feet, distress edges w/ Spun Sugar

Cheeks: Two 1 1/4″ pink circles (punch) distress edges w/ Spun Sugar Distress Ink

Eyes: two 1″ white circle, distress edges w/ gray ink and two 3/8″ black circles for eye balls. Add two dashes and a dot with a white gel pen to the blacks of the eyes to create a pupil look.

Nose: pink Stampin Up Little Labels punch:https://tinyurl.com/v3ry59kx. Round top edge of punched image and distress edges w/ Spun Sugar ink

Teeth: square 1 1/4″ tall by 1″ wide, white scrap, cut a notch in center of bottom to look like buck teeth, then distress edges w/ gray ink

Eyelashes: Cut small long slits into black cardstock. You can use Fringe Making scissors link: https://tinyurl.com/4z78643z but I chose to cut mine with normal scissors. (I remade these as mine weren’t long enough) In the end, my slits were 1″ long and the eyelashes were a total of `1 1/4″ long so I had a base to glue them on with and 1 1/4″ wide, Curl the eyelashes by wrapping them around a round object like a highlighter marker or in my case, my Pokey Tool link: https://tinyurl.com/8jb47vc5

To adhere cheeks/nose/teeth..take the cheeks and glue a small amount and overlap them, then glue the nose near the center, and glue the teeth under the cheeks at the bottom, centered.

Whiskers: I hand cut out whiskers in black cardstock, then laid the ones I hand cut onto another piece of black cardstock and traced with a white gel pen, then cut them out so they would match each other. I spread the whiskers with my fingers so they were more spread apart.

Ears: Draw 1 1/4″ wide by 2 1/2″ long ear on a white scrap, then cut it out and trace it onto another white scrap, then cut it out so both match. Ink edges with gray ink. Then using a scalloped oval punch that’s about 1 1/2″ long, punch out two pink pieces and color with new Distress Oxide Kitsch Flamingo ink link:https://tinyurl.com/v6kzwc3w to color the scallop ovals. I used Stampin Up’s retired Strawberry Slush ink to add more color around the edges with foam makeup brushes that you need to squirt twice with water before putting it into your ink. Link to foam makeup took: https://tinyurl.com/fsvb7cr Glue the ovals into the white ears you cut out.

Adhering face to bag: I’ve already glued the body down, so add the feet on angles near bottom of bag then take the cheeks, nose and teeth that we’ve adhered and glue them to the bottom area of the flap, then add the eyes that should be very close to each other above the rest of the face, and glue the ears offset and bent near the top of the bag. I punched out a lot of flowers and leaves that I had dies for in my stash (and don’t know the names of the dies, sorry) and added some with foam squares under, and some I glued directly to the bag. I added her bow (created from last video link: https://www.youtube.com/watch?v=KRpx3W29M6Q and she is done.

In the video, I went back to the first bag, and those directions are from above.

Then I show how to make longer eyelashes and how to make the face of the girl bunny look better by putting the eyes closer together (after I had to rip them off of the bag…bummer.

How to Make Any Size 3 D Bows Without Tools

I’ve been wanting to make a few videos showing you easy ways to make crafty embellishments and I’m starting with 3-d bows.

You don’t want your cardstock to be so thick that it acts like cardboard.

I used Graphic 45 paper from an old paper pad called Couture.

I cut it to 12″ long by 1 1/2″ tall and then folded the paper in half making sure the side I want showing is facing out. Cut the center fold like a tag with a snip on either side, cut on a diagonal. Then fold the ends of the paper back into the middle and crease them. If you can cut these two ends like a tag, cut them, but if you can’t cut through both, cut one at a time and cut diagonal snips on either side, then do the same with the other end.

The scissors I use are from Tim Holtz and are his 5″ snips, link: https://tinyurl.com/pfbdrzzz

Glue Dots work well for adhering the bow together…but you can use whatever glue you choose. Link: https://tinyurl.com/snv662md

Take something round like a crochet hook, knitting needle, paint brush, Sharpie, highlighter, anything round..roll the middle two sections around the round object of your choice so the paper is ready to curl. Put a glue dot on either side of the center. Then take one of the bent center pieces and lay it on one of the glue dots. Do the same with the other side to create the loopy part of your bow. Add a glue dot behind each of your loops and lay the loose flap on it..do this on the other end as well. Cut about 1/2″ off of the ends of your flaps and keep one, and cut it in half lengthwise. Roll it around your circular object then put glue dots behind the center of the bow and lay the end of the piece you’ve just cut in half on the glue dot and wrap the piece around the center of the bow and attach it to the other glue dot.

To create the flag ends, cut into the center of the end flap about 1/2″ and then cut from either end into the center to create the flag. Do the same to the other end.

To make your bow more 3-d hold the center of the bow and push the loop toward the center to make it more puffy.

To make a smaller bow, take 5 1/2″ long by 3/4″ tall scrap of cardstock and do exactly what you did with the larger bow above to create a smaller bow.

You could make a much larger bow by attaching two pieces of 12 x 12″ cardstock together and then cut it down to 22″ long by 3 1/2″ wide and follow the same directions from above.

You can make whatever size bow you choose, it’s all up to you.

I’m Obsessed with 3-D Projects and…

decided I needed to try to design one for myself. I want storage for my Prismacolor pencils I’ve tried pencil rolls, and my girlfriend even made some for me for Christmas a few years ago. If you’re not familiar with them, they look like this…

I thought I’d really like using the rolls, but I have the set of 150 Prismacolors, and I had to go through three or four rolls looking for the color I wanted, and decided that wasn’t a workable solution. So then I decided that one box large enough to hold the pencil set would be great. I even made dividers so I could put pencils in three different partitions, red/orange/yellow/pink, blue/green/purple, tans/browns/grays/black and it still seems too tricky to find colors I wanted. Here’s an idea of the type of box I used, and I just hot glued in partitions.

DIY /Vintage Box Book from recycle cardboard /CARDBOARD BOXES CRAFTS -  YouTube

I thought about buying storage normally used for pastels, but figured if it didn’t work, I’d have to figure out another use for this. My main concern is that it won’t hold all of my pencils. In looking at these, it seems the largest number of pencils each drawer would hold would be 40 (and that number seems high to me.) So that would leave me with 30 pencils and no place to store them.

3 Drawer Wood Pastel Box: Amazon.ca: Home & Kitchen

I watched a video by Mixed Up Craft and really loved the idea of it. It’s a set of drawers that she made with foam core. I will be trying to make this project from foam core in the future, but decided I work better with cardboard, and I have to create my project from scratch, as the size I want each drawer to be, is 7 1/2 x 7 1/2″ cy 1 1/2″ tall, which is much larger than anything I’ve seen a crafter do. Plus my unit will need five drawers, each divided in half. I figure that will give me one section for reds, oranges, pinks, yellows, greens, blues, purples, grays, tans/browns and the tenth section will hold black, white and blending tools.

Beautiful DIY Drawer Storage

I worked on it today, and it will take me a long time to make. I finished one drawer and cut out a lot of cardboard and a ton of hinges to make the drawers sturdy. I’m happy with the drawer I made, but hope that eventually I can make drawers faster. Four hours is way too long to plan measure, cut and adhere everything to make one drawer. I am looking forward to the time when I can measure, cut and adhere the outer case for my drawers, and hope this storage system is the last one I consider for my pencils. I’ll be making a video showing the project, but won’t be doing anything until I can make a drawer rather quickly, and then I’ll make the outer case for the drawer so you can make your own. I have to say, if mine turns out anywhere in the neighborhood as cute as the one Sam Calcott (Mixed Up Craft) made, I’ll be thrilled.

Repairing a Self-Healing Cutting Mat Used to Replace a Plate in a Die Cutting Machine

A year ago, I replaced the bottom cutting plate for my Vagabond with a cutting mat from the sewing section of Hobby Lobby. The one I bought was small, 6 x 8″, and here’s a link to one. https://tinyurl.com/pbdr66uf

Here’s a link to the original video showing how I cut it down to fit my Vagabond die cutting machine. https://www.youtube.com/watch?v=6oZ0e4lm_XM&lc=UgwnKe4rccc7rJy0o2x4AaABAg

The thickness of your cutting mat is really important, and when I was done, my mat was slightly thinner than I needed it to be, so I added a chopping mat from Dollar Tree that I adhered with tear tape to the bottom, and have never needed to replace or re-glue in a year’s worth of serious usage. Link to chopping mat: https://tinyurl.com/2d45nz86

After a year’s worth of using the replacement “cutting plate” that I made, it was getting a lot of cuts and paper fibers caught inside, so I decided to “refresh” it. You’ll want to thoroughly clean your mat with a mild cleanser. I used a combination of baby shampoo 1 1/2 tsp. to a spray bottle of water. I use this to clean everything in my craft room, including my stamps. I had to use a scrub brush to really clean it, and to remove the paper fibers that were stuck in the mat surface. Link: https://tinyurl.com/ctr7uadc After the mat was well cleaned, I covered it with a damp/wet towel that I laid over it and kept that way overnight. You don’t want to use hot water as cutting mats don’t like heat or sunlight, so also keep it out of sunlight. I made sure the towel was damp enough that it would stay wet overnight. In the morning, my mat had healed almost all of the cuts and after a year of using it, it was ready for another year.

NOTE: You can place your mat in a sink of room temperature water, but I was afraid if I did this, since I’d cut the original mat on the sides, and adhered the Dollar Tree chopping mat to the underside, that the water would seep into the sides that I cut, and would remove the chopping mat. My system worked just as well as putting it in the sink, and I didn’t have issues with it.

The Never Ending Card, by Viewer Request

My girlfriend send me a never ending card for Christmas and viewers asked if I would give it a try…So here it is.

I made an A2 sized card, but thought it would be easier to show you how to make a 6 x 6″ version.

Start with two pieces of medium weight cardstock cut to 6″ long x 3″ tall.

Score all four pieces on the 6″ length at 1 1/2″ on both ends (by turning the card stock around to the other end) then turn to the 3″ length and score at 1 1/2″ down to the score line you just made, then turn the cardstock around to the other end and score at 1 1/2″ down to the score line.

Make sure your cardstock are exactly the same size and if they aren’t shave off to make sure they are.. Lay two of your cardstock down one above the other, making sure the long score lines run from top to bottom (vertically) and put a piece of washi tape to keep them together. Then lay the other two pieces of cardstock with the long score lines horizontal (going from left to right ) Add wet glue to the cardstock with the long scores going vertically, on the top left and right square and the bottom left and right squares. They lay the other two cardstock with the horizontal long scores on top and make sure the glue has time to set up before you fold them. Once the glue is set, fold the card open and burnish each of the folds. Open the card and continue folding each until you’re back to the front again.

Decorate with:

8 pieces 2 3/4 x 2 3/4″ You can use four of one pattern and four of another.

4 pieces of 2 3/4″ x 1 1/4″

16 pieces of 1 1/4″ x 1 1/4″ squares

I used a bunny stamp and die set that my girlfriend sent me, and unfortunately, she didn’t send me the packaging, so I don’t know the name of the set..sorry

Laying down the decorated pieces can sometimes be tricky, and I recommend you just tacking the layers down until you are sure they are placed with the pattern going in the right direction. You’ll also need to make sure that the bunnies or whatever you use as embellishments, are not only placed going the right direction, but also that you glue them into the center so you don’t see them when you’re on a different fold (if that makes sense.) You want to only see the images when you open the card to that layer.

To eliminate ink I accidentally dropped on the image, use a Tombow Sand Eraser and gently remove mark.

I stamped a Happy Easter sentiment from an old retired stamp set from Amuse Studio called For Peep Sake.