I can’t believe how quickly the seven days of easy cards has been speeding past. I have only struggled with thinking of an idea on one occasion, and I think, in the end, that card came out just fine. (I’m not saying which one it is, as it might be your favorite.
It’s still deer hunting season here, and every time I hear a gun shot, I worry that our deer are being killed, especially the buck we just saw this week. I’ve always dreaded hunting season, as my dad was a big hunter, and was accidentally shot by his hunting companion during turkey season. If you don’t know about turkey hunting, at least in Pennsylvania, the hunters wear all camouflage (at least they did in the 1990’s when he was still hunting), and it was something I always worried about.. In turkey season, the hunters use turkey calls to get the turkeys to come toward them. My dad’s friend heard the turkey call and thought it was a turkey. My dad saw him raise his gun and yelled and waved his arms, and his friend saw the arm movement and shot. Luckily they were really far apart, so the buckshot spread over a wide area on dad and the area around him. The scary part of the story was that my dad’s friend was older, and when he realized what he had done, he went into shock, and my dad had to lead them both out of the woods. Dad had buckshot through his entire body and luckily, since it’s winter when they turkey hunt, he was wearing a lot of layers, and some of those stopped the shot from getting to his vital organs. He had buckshot in his ear lobes, his fingernails, his legs, arms, neck, face, above one eye…..basically everywhere. It was a horrible experience, and when I hear hunters shoot their guns, I always hope they know what they are shooting at…..and I hope if they do shoot an animal, that they don’t just wound it, as that’s a terrible way for an animal to die. Let’s not think about that.
Instead, I need to think about what projects I need to do once the seven days of easy Christmas cards are done…..Maybe seven days of rest for poor Rich, haha…no luck…he’ll be back editing the next day…or maybe I’ll give him a day off…
I had issues making the beginning of the video, sorry…and for some reason, my camera made clicking noises throughout the video…how embarrassing!
I’ve seen this technique done many times and wanted to give it a try. I wasn’t sure if it was easy, but trust me, it is….
You’ll definitely need Staz-On in Jet Black….and if you buy it, you need to buy the re-inker as it dries out faster than any other ink I’ve ever used. The beauty of Staz-On is that you can use it on other materials, glass, wood, etc., but it’s not kid friendly, and is permanent…Here’s a link to it. http://tinyurl.com/yb439fgy
I started with (on the silver version) a piece of DCWV Metallics silver paper cut to 5 x 5″.. Take the edge of your Staz On pad and wipe it across the paper in one direction. You want it to basically look like you’ve swiped it across the paper and leave lines that are in one direction..Once you choose a direction, stick with it….then once you’ve covered the paper enough for your satisfaction, rub the pad along the edges so they are all inked as well.
I used a Stampin’ Up stamp from a set called A Beautiful Season.
Here’s a link to one I found on Ebay, and they had several available there. http://tinyurl.com/yatykb7d
When using Staz-On, always keep the lid on it when it’s not in use, and don’t get rid of the little plastic cover that comes inside the lid, as it keeps the ink from drying out….Don’t use clear acrylic stamps with Staz-On, as it will stain them and you won’t be able to clean it off. If you use Staz-on cleanser or Hero Arts cleanser on an acrylic (clear) stamp, it can ruin the stamp, so stick to red rubber stamps when using Staz-on.
I stamped the deer/trees stamp with the stamp facing up and holding the paper over it with one hand and rubbing with the other.
Once it is dry, (or you’ve heat set it) you’ll want to rub your Versamark or similar embossing ink padover the entire surface of your project then cover clear embossing powder over the front and heat set it.
I put fun foam in black behind the image, trimming the foam so it is smaller than the paper..You can also use foam strips or foam dots instead. I used a piece of black velvet ribbon that’s probably 1/2″ wide and wrapped it around the top of my image and used the Tonic Funky Glue pen to glue it.. The card base is 5 1/4″ wide by 10 1/2″ tall, scored at 5 1/4″, to make a square card. I had to hand make an envelope for this card. Here’s a video that shows you ways to make your own envelopes. https://www.youtube.com/watch?v=5cnJEe3xwMU
The fine tip applicator bottle I bought is available from Aliexpress or ebay.…type in henna bottle and it should come up…here’s an example of one that has a closure for the tips. http://tinyurl.com/ya6ks7tn
The sentiment is from the Stamps of Life Christmas kit I bought from HSN.com with the Christmas treeon it… I stamped it in Versafine Onyx Black ink and put clear embossing powder on it and heat set it. I used two Spellbinders layering dies to cut and layer the sentiment.
The gold version is a 4 x 4″ gold metallic paper and the stamp is from the same stamp set….The background paper is black Recollections heavyweight cardstock that is 4 1/4″ x 8 1/2″ scored at 4 1/4″ with the same ribbon and sentiment.
I wanted to use the Stamps of Life kit that I bought at HSN.com and here’s the link to it. http://tinyurl.com/y7zcvfqe
The paper pad is called Merry Collection.
I wanted to make sure that you can make this card whether you have a die cutting system or not…so made two different cards with the same basic plan.
Card #1 I put papers in the top and bottom of the tree die and cut them out, then put paper in the middle section and cut it. I used all of the small dies for the accessories of the tree and cut several of them out, many with mirror papers.
I used a sentiment from Stamps of Life stamp set called Lights4xmas and put it in the inside of the cards with Real Red ink from Stampin’ Up.
I cut two strips of cardstock from the paper pad that were 1 3/4″ wide by 5 1/4″ tall and then a center piece that is 2 1/2″ wide by 5 1/4″ tall. I laid the two side pieces first, then laid the center piece on top and centered over the two side pieces.
I took the outer die for the tree and traced the inside of it with a marker on white fun foam, and cut it out to use as a backing for the die cut tree. I started at the bottom and glued the die cut pieces onto the foam, making sure I cut off any foam that shows once the paper is applied. I had cut the long wire die cut strips with silver mirror paper and laid them on the tree where I thought you’d find wires, then added bulbs to the wires. i glued the bulbs and the star to the tree, then added Stickles to the bulbs to make them look like they were lit. If you use Stickles, put the card out of the way after you’re done so you don’t ruin the Stickles. Card #2 I started with a card base of white Recollections heavyweight cardstock cut to 4 1/4″ wide by 5 1/2″ tall then glued a piece of patterned paper that was 4 x 5 1/4″ on top. I used an EK Success open scallop edge punch and cut the bottom edge of several patterns of paper from the pad that were each 4 ” wide.and since they were scraps, some were taller and some shorter….the shortest was 2″ tall.. I layered the four designs of card stock on top of each other and taped them together, then added tape runner and glue to make sure they stay together. I cut my own trunk and glued it to the bottom, then made a mark at the top of the tree at 5 1/4″ and then made a mark in the center at 2″ from the side as it’s 4″ wide, then drew a diagonal line from my center mark at 5 1/4″ tall to the bottom edges of the card. I hand cut the tree and fun foam in a triangle shape and glued it to the back of the tree, then glued the tree to the card. I added the fuzzy embellishments and a gold piece of card stock to the top of the tree..
I stamped the envelopes with a peg stamp Christmas bulb from pegstamps.com and here’s a link to it. http://tinyurl.com/y6uwov8o
Last night, near dusk, Rich and I were standing in our kitchen and I saw movement in our backyard. If you don’t already know, we feed deer over a ton of corn every year….and they always know that dinner’s available at the Parkers. Here’s what I saw and Rich photographed.It’s rare for us to see a buck, and this one is so beautiful with at least eight horns (that we could see)…
It made our day…
Today we were inspired to do some shopping and went to Erie to run some errands. I haven’t been able to find the mall tea lights from our Dollar Trees and luckily found them at the store there. I bought six sets, so I have twelve lights to play with for the holidays….Then we went to Harbor Freight Liquidators, and I bought a cool metal container that holds metal pieces so you won’t lose them. I think it will work perfectly for dies that I use often for sentiments, as well as any that I pull out and need to put away, but don’t want to lose in the meantime. After we got home, I went to the craft room…
I made my card using the black ice technique…and I’m not sure I love it…but we’re putting it in the lineup of the seven easy cards….Guess I’ll wait to see what all of you think about it..
I saw a version of this idea by Kay Kalthoff and wanted to share the basic idea.
I used a Stampin’ Up set called Peaceful Wishes, an old retired set…You can find it on Ebay for around $16 and here’s one link to it. http://tinyurl.com/ydgo8rdm
I started with a layer that is white cardstock Recollections heavyweight cardstock that is 4 x 5 1/4″ and had a brown layer that is 4 1/8″ x 5 3/8″ and a card base that is 4 1/4″ x 5 1/2″ in Island Indigo by Stampin’ Up..
I used a 1″ chip brush from Harbor Freight Liquidators here’s a link to it. http://tinyurl.com/ybpo58rn You can find these brushes at any hardware store, but I chose them because of their low prices….and they offered a coupon, so I saved 20% . You’ll want to trim about 1/2- 3/4″ off the top of the brush so your bristles are straight, and you’ll need one for every color family, blue, green, red, etc. and a different set for dye based inks and a set for pigment/distress oxides.
I used the chip brush with Island Indigo and brushed around the top three edges of the card. It doesn’t have to be perfect, as you’ll be stamping over it.
I used Garden Green Ink from Stampin’ Up that is still available to stamp the pine bough all around the top three edges of the card. You can use any grass green ink color for this. Then stamped in some pine cones in Early Espresso ink from Stampin’ Up (also still available, but you can use any rich dark brown ink.) I used a Real Red marker (water based red marker) from SU (still available, but you can use any water based bright red marker) and inked the berries then stamped them around the foliage, then drew lines connecting the berries with a Garden Green SU marker.(water based marker, again any grass green water based marker will work). I stamped my sentiment near the bottom right side of the card with Garden Green SU ink.
The next step is using something that looks like dots or rain or snow and stamp it all over the card with Versamark ink (after rubbing with your embossing buddy) and making sure the image is dry..My stamp doesn’t have a name on it, sorry… I used an embossing powder from Sparkle n Sprinkle called Vanilla Ice link: http://tinyurl.com/ya6umu9g and sprinkled it all over the card front then heat set it so it looks like snow. You can stamp the random dots all over the card a second time (like I did in the second card) so it looks like a blizzard..
I stamped my envelopes with the pine boughs and the red berries on the front corner and the back on the flap…
I’ve been busy like a little elf in the craft room, making cards for Christmas. I wanted to create a series of simple cards, but once I started making them, I saw problems that others might have. For instance if you don’t have a brayer with the first card, how do you make it…..so I changed my focus from just making fast cards, to making fast cards where you should have comparable supplies to make them.
The second card is really simple, and only requires a few inks and three or four stamps….I didn’t think it would be a stretch for supplies, so on to the third card. I decided to make it with the Stamps of Life Christmas kit I bought on HSN.com. It has dies included, and as I was cutting the papers included with the dies, I started thinking about people without dies or die cutters and decided to make a second version that has the same idea, but uses a scallop edge punch instead. I was hoping that it would allow viewers to make this card without having to buy the kit, since everything else is pretty much things you’d have in your stash.
I’m having a lot of fun with this series and hope viewers are enjoying it. I am still working on getting more stamp kits and today, heard back from Brutus Monroe, who has offered to send us one of his. I think this will be a great way for us to find out who have great kits and whose kits are basically a waste of money. I’ve already seen such a huge difference in value in looking at the different kits, and won’t be giving any of my own opinions, only factoring all costs so the viewer can see for themselves which brands give the best value. I’ve also seen some odd policies and will be discussing those as well..I love making comparison videos as we all learn so much from them, at least I do..
Time is always so short this time of year. I saw Tina Zwick make a very similar card, and had to give this a try. I’m going to make seven cards in seven days that are fast and easy to make in bulk.
I started by using the Woodlands Textured Impressions Embossing Folder from Stampin” Up and white cardstock that is 5 1/4″ by 4″ tall. I used Marina Mist ink from Stampin’ Up and rubbed the ink pad across the front inside of the embossing folder (the side that says Stampin’ Up at the bottom)….color the folder until you’ve inked it almost completely. The part that’s closest to the fold needs inked, and the portion at the opening not so much, as your paper isn’t as large as the folder. The folder is right side up if you look at it holding the fold at the bottom (closest to you)….so you’ll need to make sure you stamp your trees with the fold of the embossing folder toward you. I used a stamp set called Definitely Decorative Pines (retired, but you might find it on Ebay) There’s an even better pine tree in their set called Lovely as a Tree that I own, but couldn’t find…I used Handsome Hunter Stampin’ Up ink (retired), but you could also use Garden Green Ink from Stampin’ Up for the same effect. I inked one of the trees and stamped the tree on top of the ink that’s already on the folder (making sure you have the fold of the embossing folder at the bottom closest to you)… I stamped three trees on mine, then took the white paper and laid it toward the center of the side I’d stamped on, and ran it through my Vagabond.
Once you have the embossed image out of the Vagabond, take a brayer (mine is from Speedball and here’s a link to it so you know what you are looking for http://tinyurl.com/yddn4zos ) Run it across the ink pad in one direction several times to ink the entire brayer. I used a Stampin’ Up ink called Soft Suede to do this technique. Gently rub it across the embossed tree image until you get the color you want. Make sure you do this with scrap paper under it, as it’s pretty messy.
I took a retired punch from Stampin’ Up called a Designer Label Punch (here’s a link to one I found on Ebay http://tinyurl.com/ydd5422k ) and punched a white piece of cardstock. Normally I would stamp my sentiment and then punch out the cardstock, but for some reason, did it in the reverse this time…It is much easier to stamp it first and then punch it out by placing the sentiment upside down in the punch and looking through the window until you see the sentiment is where you want it, then squeeze it a little bit to hold it in place, then punch it out. I used a stamp set called Lights4Xmas from Stamps of Life for a sentiment “Christmas Wishes”..(I had to cut the sentiment in half to make it fit in the punch). I put the sentiment in the MISTI and used temporary adhesive from Glue Dots (link: http://tinyurl.com/y8chxpzb ) to put on the back of my punched designer label and laid it in the MISTI so the sentiment fits inside.
I inked it with the same Soft Suede ink several times. I took a piece of 3/4″ high organza white ribbon that was about 7″ long and wrapped it around the tree image and glued it to the back..I chose to put it near the top, but you could put it wherever you choose. I ran tape runner from Glue Dots (extra strength) on the back of the tree image, and then put a small amount of wet glue under the ribbon where the sentiment would be to hold the ribbon in place, then put foam dots under the sentiment and laid it over the glued ribbon. I added some pinecones to my envelope with soft suede ink. The pinecone is from pegstamps.com and here’s a link to it. https://pegstamps.com/pinecone-large.html
Before I finished, I wanted to see if there’s an alternative to using a brayer for those of you who don’t own one….I used the ink pad first and I got ink everywhere, so tried a foam dauber for my finger tip and it didn’t work as well as a brayer either, but would probably work in a pinch….
If you don’t have a Stampin’ Up representative and would like to order the embossing folder or any of the Stampin’ Up products I used in the video, I just met a really nice Stampin’ Up representative who was kind enough to give me one of their card kits for our kit comparison….His name is Brian King and you can order directly through him using this link http://www.stampinup.com/ecweb/default.aspx?dbwsdemoid=2104107
If you have any questions, you can also email him at stampwithbrian@gmail.com. The products I used from Stampin’ Up! are: Woodlands Embossing Folder Lovely as a Tree stamp kit (it has the larger pine tree that you’d want to use). The stamp I used is discontinued.
Inks: Marina Mist (retired) Handsome Hunter (retired) Garden Green Ink would work great in place of Handsome Hunter and it’s still available Soft Suede
I hope you enjoyed our first in the series of seven simple Christmas cards….
I stayed up past midnight last night to make sure the video went live at exactly midnight, then got up at 8AM to ensure that the video and blog post were all correct. I’ll be honest, I’m not cut out for the pressure of being a guest design team member. It’s just too stressful and I left that life behind when I gave up my banking career.
I’m happy to be back to my own schedule, my own video ideas, and products of my own choosing. I’m glad I tried the experience, but am even happier that it’s over. I’d worked almost non-stop on the four cards for the last week, and I’m not equipped to that kind of schedule…You’re right, I’m now a slow pace kind of girl. I used up all of my “get up and go” when I was working, and now it’s gotten up and left me….That was not proper English, of that I am sure…
So I spent the day napping and watching YouTube videos. I know it was a big wasted day, but sometimes I just need to do that. Some people watch television, and I watch YouTube. I absolutely love watching really old Lindsay (frugal crafter) videos, as I have learned so much from her. She’s taught me so many tips and tricks and what tools to use and what tools to save money on, and I admire her for that. A lot of people say she talks too fast, but I have never had a problem with her speed. My mind races all the time, so listening to someone else whose brain is also racing, seems to relax me.
Tomorrow I’m on to some new videos and hopefully I’ll get serious about my Christmas card videos…I know Rich has a couple of videos from last Christmas that never made it online, as we ran out of time…so we’ll get those up and then I can get serious about making more…
I was sent the Banana Split kit for November with a sophisticated and elegant theme.
Included in your kit will be four card layouts, as well as a list of the items you will be receiving in your kit.
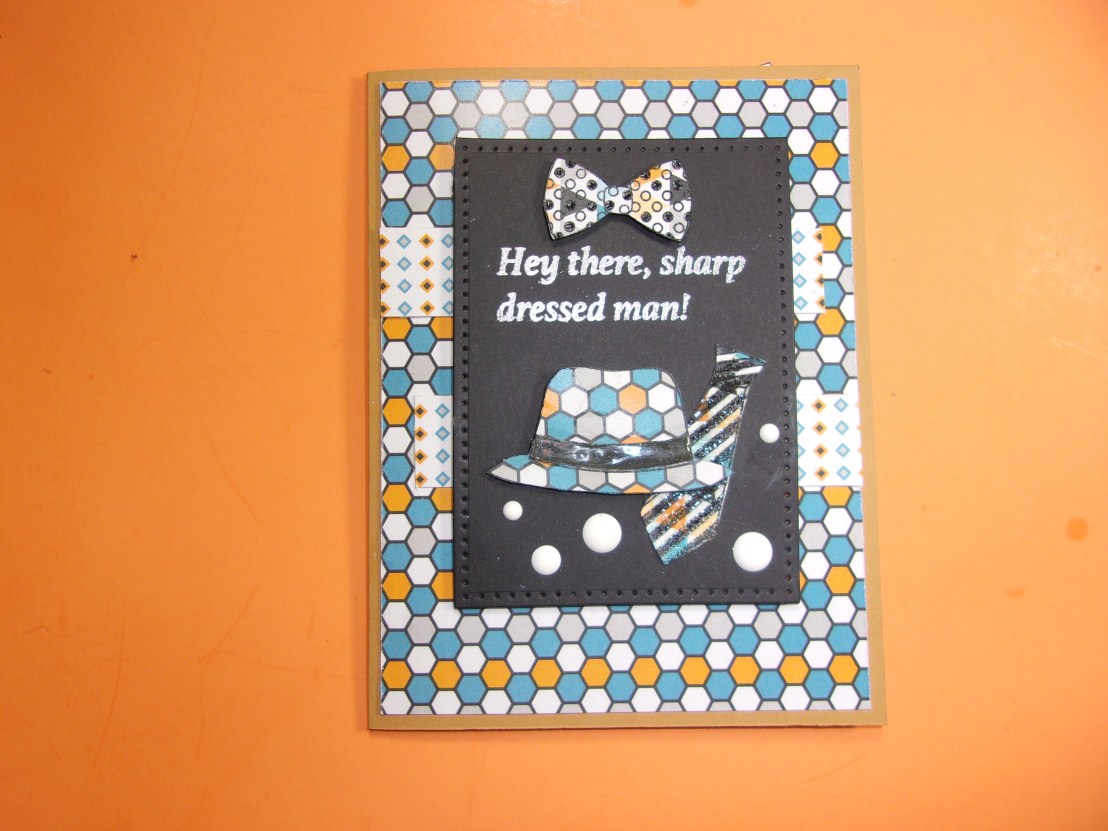
The first card I made was using the Dapper Man stamp set:
I started with one sheet of gold cardstock and cut it at 5 1/2″ on the 11″ length then scored it on the 8 1/2″ length at 4 1/4″ to create an A2 size card. I used a piece of cardstock that was half gray and half striped, and I cut two strips of the striped half, that were 3/4″ wide and used the all gray piece to cut a rectangle with a die. I used the hat, bow tie, and long tie stamps on one acrylic block, and stamped them several times on different card stock patterns (provided in the kit) and inked them with Versafine Onyx Black ink then added clear embossing powder and heat set them. I fussy cut all of the hats and ties, then stamped some hats on black card stock and gold card stock. I cut out only the band of the gold and black hats, then used an embossing marker and colored the bands then dipped them into clear embossing powder and heat set them. (If you don’t have an embossing marker, you can dip them into your Versamark glue), I glued these bands over the patterned hats I’d stamped, so the band would stand out(but still matched the colors in the hat.) Then I took a black water based marker and colored the stripes on the ties and the dots on the bow ties, and dipped them into clear embossing powder and heat set them.
I put the layout beside my card base, and glued a piece of matching cardstock that was 5 1/4″ tall by 4″ wide onto my card base. I used the strips that were 3/4″ wide by 3 3/4″ and glued one about 2″ from the top of the card on the left edge of our patterned paper, and glued the next strip about an inch lower, laying it on the right side of the patterned paper. I then took my rectangle of gray card stock and added the sharp dressed man sentiment to it with Versafine onyx black ink with clear embossing powder, and heat set it. I added the hat below the sentiment with foam squares under it, and the long tie to the right of the hat, overlapping the hat over the tie just a little bit. I added the bow tie above the sentiment and added some of the white enamel dots around the ties and hat.
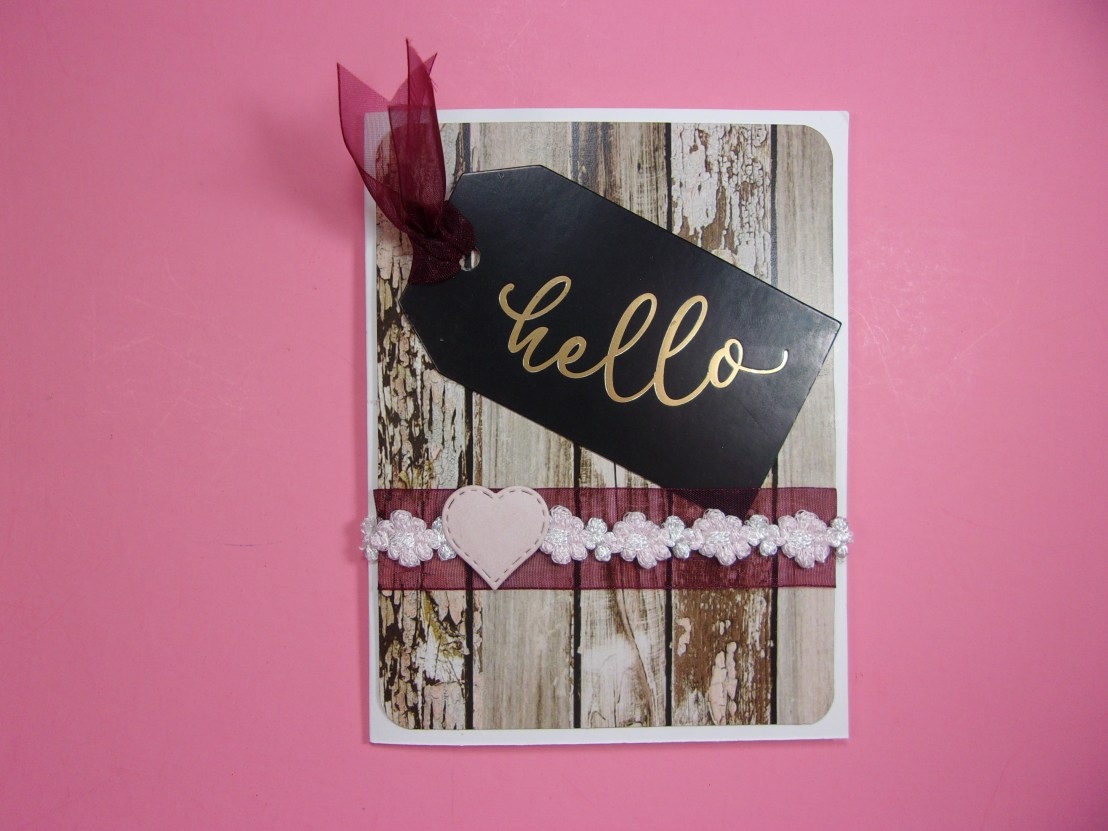
The second card I made with white Neenah paper included in the kit, and cut it to an A2 size card. I used the paneling paper and trimmed it to 4″ x 5 1/4″ then rounded the corners with my Kadumaro Pro corner rounder from Amazon. I tried to use the rounded rectangle in pink cardstock, but couldn’t get it to turn out the way I wanted it, so eliminated that portion of the layout. Instead, I layered a burgundy organza ribbon that was 1″ wide and put a 4″ length of pink and white floral ribbon centered over the burgundy ribbon. I had already glued the paper down before adhering the burgundy ribbon, so used my scissors and pushed the ends of the ribbon under the paper to glue the ribbon in place. I put the burgundy ribbon about 2″ from the bottom of the card with the white and pink floral ribbon centered on the burgundy ribbon. I used a tag that came with the kit that said “Hello” and pulled a loop of the burgundy ribbon through the hole on the tag and then pulled the ends of the ribbon through the loop and pulled them tight. I trimmed the ends like a whale’s tail by folding the ribbon in half and cutting from the center toward the ends of the ribbon to create a diagonal cut that once unfolded, creates the look of a “V”. I glued the Hello tag down with a glue stick and used Beacon’s Fabri Fix to glue the floral ribbon to the burgundy ribbon. I stamped the inside of the card with “You are so beautiful” from the stamp set provided and inked it with Stampin’ Up’s Pretty in Pink ink. I used the pink paper provided, and a heart die, and cut a heart then attached it to the left side of the floral ribbon on the front of the card with the Beacon Fabri Fix glue. I stamped the back with “Made by Sandy Parker” stamp that I had made by Stampanda.com.
For the third card, I wanted to make a 5 x 7″ card with the little girl stamp made by Santoro. I started with pink card stock cut to 10″ by 7″ and scored on the 10″ side at 5″, to make a 5 x 7″ card. To follow the layout, I needed to use three dies. I used a square die that was the same size top to bottom as the inner oval die I was using. Then I used another oval die that was about 1/2″ taller than the first die. I wanted to use them to create a frame, since I didn’t have an oval scalloped die like was shown on the card layout. The first thing I did was cut out different papers with the dies. I used a black floral image to cut the ovals, and made sure they were well spaced from each other, then taped them together to ensure when they went through the die cutting machine, they would stay even with each other. I took the center of the oval and used my “Sparkle” die (that came with the kit) and cut it out on the die cutter. (You need to keep all of the small pieces that fall out of the letters.) I took my oval and put a piece of scotch tape on the back and laid the word Sparkle in black foam into the opening created by the die cut. I then laid the small pieces back into the sparkle that fell out of the letters. I decided I wanted a black card stock over the foam, so cut it out with the die, and glued it over the foam….I used a Spectrum Noir glitter pen to add sparkle to the word sparkle. I took this oval and glued it in the inside of the card and added a sentiment from Ellen Essentials stamp set called Sparkle (that was not included in the set) that said “You make my life” stamped in black ink on pink cardstock and laid this right above the word Sparkle.
The square die I cut with another patterned paper and set it aside. I wanted to use a black and white patterned paper for my background, but I only had 6 x 6″ paper packs….so I took the 6″ long paper and cut it to 4 3/4″ wide and then cut it in half at 3″. I used a piece of cardstock with shoes and purses on it, and glued it to a pink piece of paper that was 1″ tall by 4 3/4″ wide, then laid the 3″ black and white pieces next to a ruler, so I could lay one piece at zero and the other piece to stop at 6 3/4″ so there’s a gap between the two papers. I used a glue pen and glued the edges of the center of the black and white papers and then laid the strip I’d created with pink paper over that gap and glued it down. Then glued the shoe paper into the center of the pink paper (this strip was 4 3/4″ wide). This allowed me to turn a 6″ piece of cardstock into a 6 3/4″ tall piece. I then glued this piece to our 5 x 7″ cardstock. I took a piece of the white Neenah cardstock and used the smaller oval die to cut it out. I stamped #53 Sugar and Spice Santoro girl stamp with Simon Says Stamp ink (as it works well with alcohol markers.) I used some Spectrum Noir markers and a bunch of Touch Five alcohol markers to color the Sugar and Spice doll. I added some Reminsce white gel pen that was provided in the set to make lines in her skirt and decided to put her on foam squares on the front of the card. I took the pink square that I had die cut and went around the edges with Walnut Stain Distress Oxide ink and also went around the edges of the oval of our stamped doll with the same ink to make it look more cohesive next to the brown oval. I glued the square into the center of the card, then laid the doll centered over the square, then glued the oval frame around her with a glue stick. There were pink rhinestones included in the set, and I used an alcohol marker to color over them to make them match the colors in the card better, then glued the rhinestones around the doll and in the squares of the background paper. I added Spectrum Noir glitter pen to her hair and over the “sparkle” on the inside of the card. I cut out a sentiment strip that said “Life is a party” and added that to the right side of the front of the card near the top… That finishes our third card.
I stamped the back with my Stampanda stamp and went on to our fourth card.
Our fourth card is simple, and involves the lady with the butterfly skirt stamp called “What if I fly”…. This is an A2 size card with a white card base. I used one of the papers from DCWV that was floral filigreed and I cut it to 4 1/8″ x 5 3/8″ and glued it to my white card base. Then I took a strip of the black glitter paper and cut it to 4 1/8″ wide by 1 1/2″ and glued it over the paper at the very top of the card. Then took silvery paper that is 4 1/8″ wide by 1″ tall and glued it directly beneath the black glitter paper. Then I took black glitter paper again and cut it 1 1/4″ tall on the left side and 1/2″ on the right side. I drew the marks on the back of the paper and used my paper trimmer to cut it out. I then took another piece of the silvery paper that was 2″ by 1 1/2″ and then outlined it with black glittery paper by holding the black paper under the silver paper and trimming about a 1/8” border around it. I cut a “V” in the bottom of the black paper and cut it out of the silver paper by holding it (again) about 1/8″ away from the bottom edge.
I had cut a circle out that was large enough to hold the lady with the butterfly skirt, and stamped her with Versafine Onyx Black Ink and then heat set it with clear embossing powder. I also stamped some of the butterflies that were included in the set and put clear embossing powder over them as well. I added black foam to the back of the circle die cut and glued it together with a glue stick, then glued the circle to the front of the card on the silver strip toward the top of the card. I stamped the sentiment from the set inside the card.
Here’s the link that will take you to the blog hop…Hope you enjoy all of the terrific cards these ladies made:
I finished some videos that I wanted to go live before Black Friday, as there are some discount codes I don’t want anyone to miss out on. I also made a pearl covered pumpkin and thought that would be a nice way to post a video, as well as wish viewers a happy Thanksgiving.
I’ve been working diligently on the four cards I created from the card kit for Scrapping for Less and Rich has been working on editing the video tonight. In the middle of it, he came to me and said he’s missing a memory stick (again!) I’m starting to get so frustrated with this continuous problem, that I’m almost ready to throw in the towel on the channel. I don’t have any ideas on how I can avoid these sticks being misplaced, as I put them in an envelope inside a notebook with all of the information I need edited. If there is more than one video on that memory card, Rich sometimes accidentally deletes the extra videos, which is what happened with my sister’s birthday card. I’d love to show you that video, but if he doesn’t find the first three clips, it’s pointless, because I did all of the work with the Nuvo powders in those clips. Tonight he thought there were two missing clips. I thought I was going to lose my mind because I’ve been working on those cards for days and if one card’s videos were missing, I had no idea how to overcome the problem. We went through every notebook and my office, when apparently an idea came to him, and he said he found the clips. I told him if we hadn’t found those clips I was seriously considering throwing in the towel on the channel, because I just can’t handle putting so much work into a project, just to have the video disappear. So I’m coming up with a new plan. I think I’m going to copy the memory card onto the hard drive of my computer, and if the clips disappear, I’ll have a back up. I just can’t keep going through this, it’s just too stressful. That might sound a little bit hysterical to you, but this is three times in a two weeks that we’ve gone through every memory card trying to find missing clips, and it’s work that’s lost, and seemingly for two of the videos, not to be recovered.

 It’s rare for us to see a buck, and this one is so beautiful with at least eight horns (that we could see)…