Category: Uncategorized

Painting with Alcohol Inks, Great Card Ideas

I know I’m late with a Mother’s Day card, but timing isn’t everything..And this video is more about the technique than the card… I started with a cereal box, and cut it so I had the front and back of the box to use….I glued a piece of aluminum foil (shiny side face up) to the box. (I glued the aluminum foil to the inside of the cereal box panel, as I wasn’t sure if the aluminum would stay attached to the shiny finished side of the box.) Make sure you do a good job of gluing the edges and corners, as they will pull up with time.

I cut the cardboard/aluminum piece to 5 1/4″ tall by 4″ wide and put it in a Brutus Monroe embossing folder called Petal Lace (link: https://tinyurl.com/y7gsfrcn ) and ran it through my Vagabond electric die cutting machine. (link: https://tinyurl.com/y8j5fqmy ) I love the Vagabond and highly recommend it for people with hand/wrist strength issues. The card base I used was 8 1/2″ wide by 5 1/2″ tall scored on the 8 1/2″ length at 4 1/4″…making it an A2 sized card. I use Recollections Heavyweight card stock in white from Michaels link: https://tinyurl.com/wq2663j .. I found Ranger’s Alcohol Ink tool kit at Joanns (link: https://tinyurl.com/yb9y3guq) and wanted to give it a try. I received Ranger’s Pearlized Alcohol Inks #2 in a stamp of the month kit, and found them only at Hobby Lobby in the big chain stores..link: https://tinyurl.com/ycvgqucy. You’ll also need Ranger’s Alcohol Ink Blending Solution link: https://tinyurl.com/ybgo6jg4. This is great for re-wetting dry alcohol ink and helping you clean your palette. I also use a spray bottle of rubbing alcohol to clean my work surface and tools.

You can make a lot of the tools you can buy (traditional tools not brushes) by gluing a piece of velcro to a pill bottle with the lid glued or Duct Taped on…then cut circles out of cheap white felt that are the same size as the lid and attach them with the velcro. Traditionally, alcohol inks were used in making abstract art and that’s what this tool helps create.

I wanted to see if the paint brushes provided in the tool kit would allow me to make a design that I can control. And they do. I painted the Intrique (Ranger Pearl Alcohol ink set #2 mentioned above) color in the larger sections of the embossing folder, then Tranquil from the same kit, in the centers of the flowers and Sunshine Yellow Ranger Alcohol Ink link: https://tinyurl.com/yccoz8g6. I colored a thin satin ribbon by running it through the Intrique alcohol ink left on my palette. I added a small tag that was die cut and stamped with Happy Mother’s Day from a Hero Arts stamp set called Celebrate Everyday (link: https://tinyurl.com/y9z7fado). I wrapped the ribbon around the left side of the card and attached it to the back with foam tape I bought at the Dollar Tree. I put several rows of foam tape on the back so the card is raised. I painted around the edges of my card base with Tranquil pearl alcohol ink and then glued the aluminum piece to it.

For the envelope, I used the leftover alcohol ink on my palette with a peg stamp called Poppy Face Large link: https://tinyurl.com/y93erz8h and stamped it across the back of the envelope and one on the bottom right corner of the front.

The stamp I created on the back of the card is one made by Stampanda. It’s a square address stamp called Molly that I changed the address to the wording I wanted. I used a coupon I found online at Groupon to make it around $24.

For the other two cards, I used embossing folders from Darice. The thinner piece was run through the their Quatrefoil embossing folder link: https://tinyurl.com/y8vnza8u, then painted with two of the colors from the Ranger pearl set #2 mentioned above. I die cut the word Hi out of the left upper side of the card base and glued a piece of mat aluminum colored card stock under it and glued the same color cardstock as the card base cut to 4 1/8″ x 5 1/2″ to the inside left side of the card base to cover up the aluminum cardstock back.

The other card was also made using a Darice embossing folder, unfortunately, I don’t know the name of it. Sorry. I used the same Hero Arts stamp kit for the sentiment and a gold color ribbon wrapped three times around the card front. I used Ranger older alcohol inks in Currant, Watermelon, Sunshine Yellow and Sublime from the Pearl kit mentioned above. I made this card the same way as the first card.

Dollar Tree Mother’s Day Gift, Making a Designer Box for It

I found the set of bath and body products at my local Dollar Tree, but not in their online store.

The piece of scrapbook paper I used was double sided and I cut it to 8 1/2″ x 12″ long.

Put the paper in your score board with the pattern you want on the outside of your package face down..  On the 8 1/2″ length, score at 1/2″, 1 1/2″, 7″ and 8″. Then turn to the 12″ length and score at 1/2″, 1 1/2″, 6 1/4″, and 7 1/4″. Fold all of the score lines then with the 8 1/2″ length facing you with the 1/2″ score closest to you, cut out to the second score line on both left and right sides, up to the 1/2″ score, then angle the edges left behind, so they aren’t straight. Then at the next score (1 1/2″), cut to the second score line on both sides, and cut out the first score line. This should leave a flap. Go to the last two scores and cut both to the second score line and cut off the first score. This makes a flap, and you can glue this flap down on both sides.

Now, let’s glue the box together. In the section between the flaps at the beginning and the middle flaps, fold down the first scores and glue them down. On the other end of the box, put tear tape inside the the first scores and on the outside of the first scores and fold them down on the inside tear tape, then take the release paper off the outside tear tape, and hold the box so it is perfectly closed and line it up so it’s a square and glue down one side….after rubbing the inside with your hand or a ruler, to ensure the tape stays well adhered. Then do the same to the other side. The side flaps that are left behind, cut half of it off and cut angles on the sides so you can push it into the box. To close the box, tuck the plastic bag inside and then push the flaps inside the box and tuck the tab into the top with some sort of closure…I used Glue Dots.

I used matching ribbon from Stampin’ Up and wrapped two lengths around the box. I adhered it with tear tape, then made a bow with my bow jig. I attached a second video demonstrating a bow jig as well..Here’s a link to it. https://www.youtube.com/watch?v=ax_UDvC6wKU&t=3s I wrapped the bow around the ribbons and used Glue Dots to adhere it to the box.

I have leaf ribbon from BeeBeeCrafts…here’s a link to it. https://tinyurl.com/y5boy6fr I wrapped the leaf ribbon around the box and used Glue Dots to adhere them..

5/5-5/8/2020

I’ve been working on Mother’s Day video ideas and I know I’m late, what’s new there.  I don’t have anyone to give a Mother’s Day gift to, but wanted to be sure to put up videos related to Mother’s Day.

I’m not sure if I talked about the small coin purse I wanted to decorate with leftover diamonds from diamond paintings, but made a video showing that process.  It’s definitely not my best work, but what can you do when your glue is so smelly, you think you’re getting brain damage from it?  OK, that’s just an excuse.  It wasn’t as easy to do as I thought it would be, and I think the end product reflects that…but maybe this was a project for more nimble fingers.  I hate admitting that, but I think you’ll figure it out for yourself when you see me try it.

As for the Mother’s Day card, I think I hit this one out of the park.  I wanted to use aluminum foil attached to cardboard, run through an embossing folder, and painting it with alcohol inks.  I love the end result, and think you will too..

And of course, I had to come up with an inexpensive gift kids could give their mothers, and found a small set of bath products at the Dollar Tree and made a gift box for it….Three new videos, and hopefully all will still be helpful this close to Mother’s Day…Now all I have to do is get my editor to put the videos online…Yes, I know it’s the Friday before Mother’s Day and none of these videos are live yet.  I’d like to say I’m working on my time management skills, but the truth is, I’m still obsessed with diamond paintings, and I had one I’ve been working on this week that’s about 70% one color, off-white, and is a Christmas themed art piece….yet I still can’t stop myself from prioritizing that over what I should have been doing,  my Mother’s Day videos…

All in all, if you watch the Mother’s Day card video, painting with alcohol inks, you’ll realize it’s a card for all seasons, and maybe you’ll be obsessed with the idea like I am..

I’ve never been good with alcohol inks because I’ve always seen them as only usable for abstract art, until now.  I had such a great time playing with them, that I couldn’t stop with one card, and ending up making three.  If you own alcohol inks and aren’t running out to buy the paint brushes, Ranger’s selling for them after seeing the video, I don’t know what will influence you do to so…they’re so much fun, and opened a whole new world (for me) using alcohol inks.

5/2-5/4/2020

I’d like to say that I have been working like a beaver in my craft room, but to be honest, (and I rarely am,) my arthritis has been in a bad flare, and I haven’t felt like doing much of anything.  I have been reading a lot, a series much like the Jack Reacher series…This one is the Peter Ash series, and I’m really enjoying it.  I’ve also been working on diamond paintings, trying to make sure I finish all of the art I currently have, before the next round of mail comes in.  One of my viewers kindly gave me a gift card to Amazon, and I used it toward a magnifying lamp that you position over diamond paintings.  The magnification is throwing me off my game, but the light is tremendous.  I have a light pad under my work, but that only illuminates under the project, so you can see where the diamonds are placed.  It puts the diamonds themselves into a shaded area, so it’s hard to see if they are upside down or right side up, and this lamp does a great job of illuminating them, so I no longer have trouble seeing them well.  Here’s the lamp I got.  
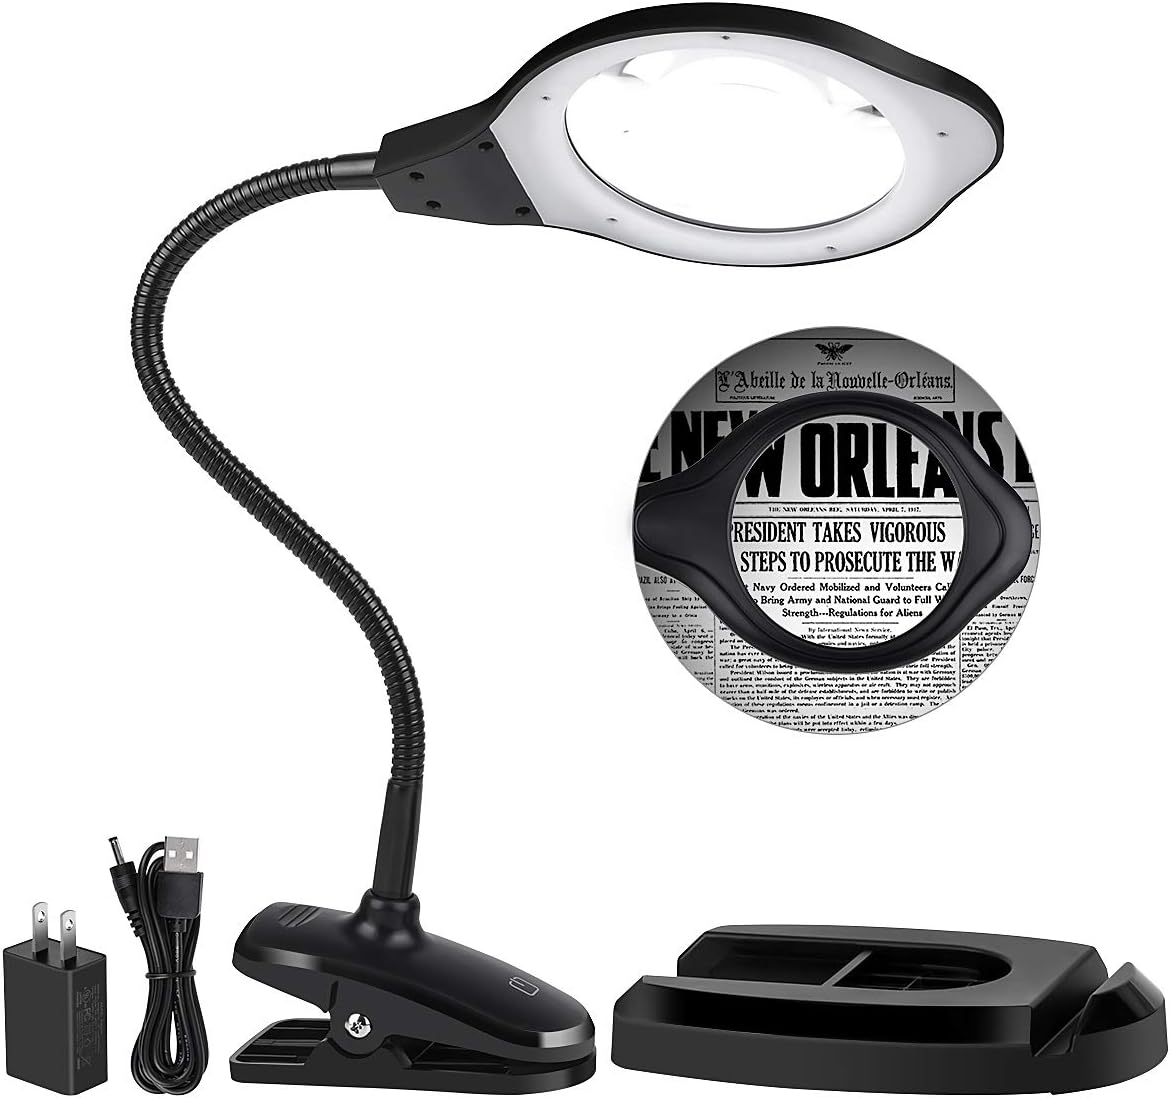
I looked at a lot of magnifying lamps, and two things about this one were great selling points…The first is the plug..I don’t want a battery operated lamp, nor do I want a lamp that I have to attach to other technology…This one came with a plug, and that was what I wanted.  Also, most of the lamps only came with a clamp, and I wasn’t sure if a clamp would ultimately get in my way.  I wanted to have a lamp that I could position anywhere I wanted it, and if it only has a clamp, that limits where it can be placed.  Also, I use a dining room table for diamond art, and it has a really thick lip, and I know the clamp wouldn’t be large enough to accommodate the lip, again, making the clamp useless.  So far I really like it.  I tried the magnification, and at first, thought I’d really like it, but I have a hard time figuring out where my hand is in relation to the painting.  That probably doesn’t make sense, but when you think about your hand being magnified and the painting being magnified, your movements are also magnified…therein lies the issue.  Every movement I make, feels awkward and huge.  You have to try one of these to see what I mean.  And maybe it’s just me…It’s entirely possible that it is.

I’m definitely going back into the craft room tomorrow and producing something.  I need to make the travel journals I’ve been talking about forever, and I have trivets from the Dollar Tree that I’d like to cover in fabric, and lastly, I’m thinking of doing a series of Christmas cards called Christmas Cards during Corona…Is that a horrible idea?  I know that a lot of people make Christmas cards early, and I always make mine super late, so maybe this is a way for me to actually make Christmas cards that might inspire others to make theirs.     But I’m probably too late with this idea, as our county/state is looking to open up next week….and I’m happy that they are, but not sure how it will work. Here’s why..  I went to the grocery store with Rich two days ago and there were so many people not wearing masks, or not wearing them over their nose and mouth, and I was so disgusted.  When it’s mandatory to wear a mask, can’t people just do it?  I heard today that a person was shot and killed for telling someone they couldn’t go into a Dollar Tree without a mask….Is this what we’ve come to?

I think I’ve turned into a crazy old person, as I couldn’t just walk by the people not wearing masks, or wearing them improperly.   Instead, I said things like “Your mask needs to cover your nose and mouth,” or “You need a mask.”  And it wasn’t like I muttered it under my breath…I made sure the people heard me.  I was prepared for them to say something sarcastic back, but they didn’t.

I had a Zoom call with my college girlfriends and told them what I’d said, and they both said they wished they were that brave.  I don’t know if I’m brave or stupid.  I just can’t understand why people won’t follow this directive.  Do they think it’s beneath them, or that they don’t have symptoms so clearly they don’t need to wear a mask?  Whatever the answer is, it’s not good enough…We all need to be diligent if we want to get rid of this virus and get our country running again.  And, most importantly, we need to work together to do this.  This isn’t the time to be bucking the system…it’s time to pitch in and try to make a difference.

I bought a Corona stamp set and will be making some cards to give to seniors in local nursing homes..  They can’t have any visitors.  Can you imagine how lonely they must be?  Maybe if we all do something small, it can be the difference to get us through this with our sanity, and our health, intact.

Art Journal, Coloring on Tissue Paper

I saw this tissue paper on Amazon, but it was out of stock…I fell in love with it and saw so many possibilities for using it, and adding it to my art journal, then coloring it, sounded like a great starting point.  Of course I’ll use it on cards and probably wooden surfaces as well.

The tissue paper I bought on ebay, and here’s the link: https://tinyurl.com/yaalfhda

The Arteza Sketch Twi-Markers set of 48 link: https://tinyurl.com/ycn2gyax

I used Elmer’s Clear School Glue with a paint brush on the art journal, then laid the tissue paper over it, making sure to try to remove any wrinkles. I let the glue dry and then torn and cut all of the excess tissue paper from the edges of the journal. My set of Twi-Markers is a set of 48, and I used a large variety of colors while coloring. I used the brush tip for coloring, as it covers a lot more space than the fine tip.

Helpful tip: I use a sticker and color each marker on a strip of sticker, then put it on the marker so I know exactly what color each marker will be. This is a really helpful way of labeling your colored pencils and markers.

I had a bird sticker left over from the birdhouse stickers I bought at the Dollar Tree, (link: https://tinyurl.com/vtwm624 ) and glued the bird sticker on the art journal then outlined the bird with a black Sharpie. I also doodled around the page and on the flowers….

4/30-5/1/2020

I want to offer a cautionary tale about diamond paintings.  Most companies sell a standard size of 30 x 40 cm.  It sounds big…over 11 inches by almost 16 inches…but what they don’t tell you is that’s the size of the canvas…the entire canvas, including the part that surrounds the painting where they print the legend for the diamond colors…That wouldn’t bother me, but I bought a painting on ebay that was (I think) 30 x 30 and was supposed to be little hedgehogs surrounded by dandelion seeds..Here’s a photo of it.

DI-KQ-BL-DIY-5D-Cute-Hedgehog-Dandelions-Full-Diamond-Painting-Wall-Art-Home

When you buy a small diamond painting, the image gets almost blurry, but in this case, I couldn’t tell what the animals were supposed to be when I was almost finished.  The thing that was frustrating, was the fuzz that surrounded them almost looked like fur, and they appeared to be floating sheep if you looked at it closely.  A lot of companies will sell diamond paintings really inexpensively, but it’s because of the size, and if you do buy a smaller 30 x 40 image, I recommend you pick out something that is simple and only has one focal image, so there’s not a lot of detail that can be lost in sizing….Needless to say,  I didn’t finish the painting and contacted the seller with photos, asking for a refund.  I just got a second email from him saying he’d refund the purchase price…His first offer was $1 and that didn’t even cover postage…

I went back to the craft room today with the idea that you get so many extra diamonds with every project you do, that I want to start finding ways to use them.  I bought a small cloth change purse and made some flowers on it with leftover diamonds…You’ll have to let me know if you think I should give up trying to use them, since the project looks a little like a child glued the diamonds to the purse…Fabric glue is not easy to work with, let’s just leave it at that..

Turning Fansells.com Photo Album Into Die Storage

I started with a Fansells.com photo album link: https://tinyurl.com/y8m7jbdg and Magnetic Vent Covers from Amazon link: https://tinyurl.com/y7o9hxta  Note: You can buy the vent covers at your local hardware store for under $5, but I was quarantining, so bought what I could get online.

I needed to cut the strips of vent cover to 6″ tall x 4 1/2″ wide. (Initially, I measured the outside of the album, so I had to cut twice and had more thin strips left over.)  I didn’t want to waste any of the magnetic sheets, so all of the scraps were used.  I put tear tape on the back of each piece, making sure to go around the entire sheet, and run a couple of lines of tear tape through the center section so the magnet would be well adhered. I laid the magnetic sheets as close to the outside of each page so the bulk caused from adding the dies won’t make the album bulge.

For a closure, I decided to wrap elastic around the album with an eyelet.  Before putting the eyelet in the album, I coated the diamonds with Deco-Arts Triple Thick Gloss Glaze (link: https://tinyurl.com/ycncrdx9) and let it dry. This will help to make sure the diamonds don’t pop off with use. I used my Crop a dile (link: https://tinyurl.com/y9vfps5f ) to punch a hole through the front cover near the center about 1/2″ from the right edge. I put an eyelet there and squeezed it in the Crop a dile to adhere it. I took elastic string I found at the Dollar Tree in the kids craft section and cut two, two feet lengths to keep the album closed. Hold both strings together and fold them in half. From the inside of the cover, push the folded strings through the eyelet. I used a white button and pushed the string ends through the holes of the button. I pulled the strings so I could decide how long they’d need to be to keep the book closed, and once I determined the length, made sure the button was flush with the back of the book and tied double knots in the strings to ensure they stayed tied. (Note: Fill the album before this step.)

Before cutting off most of the excess elastic string, wrap the elastic around the album to decide if it is tight enough (or too tight.) If it’s not tight enough, un-knot the elastic, and pull more through the eyelet and retie the knot. Wrap it around the album again, and if it feels right, cut off most of the excess string. If it’s too short, un-tie the string and pull more through the eyelet, wrap it around the book, and if it’s good, tie it and cut off most of the excess. I leave a little extra elastic in case my book grows thicker if I add more dies.

Even with all of the magnetic vent covers, I didn’t have enough magnetic sheets to hold all of my holiday dies, so after showing the video, I added more magnets that I had on hand and now all of my holiday dies fit and stay put. I really like this project and hope you do too…It gives you another way to use diamond art to make pretty storage, or a lovely photo album..

Thanks to the nice people at Fansells for the photo album, I love it.

4/27-4/28/2020

I know you think we are crazy, because we filled our bird feeders after the bears took them down and filled their bellies with lots of sunflower seeds.

A couple of days ago, Rich convinced himself that the bears were not coming back, so he re-filled our bird feeders…When will we learn that those bears are smart and will always outwit us?  Last night,  our Blink Security System (animal watching cameras) sent notice to Rich’s cellphone that we had activity.  He thought it was a deer…wrong again,  The bear were interested in finding out if the dim-witted Parkers had refilled our feeders….And they pulled all of them down and ate everything…The funny thing is, I opened a window (and forgot it was open) in the sun room that leads to the patio where the feeders hang…We should have heard them bending the shepherd’s hooks in half, wouldn’t you think.  And taking down every feeder, rolling them around and taking some with them…Especially after we’d seen the Blink video of two of the bear…We aren’t that smart, at least we’re not smarter than the average bear…anyone remember that, BooBoo?  (Yogi bear is where we heard that saying in case you didn’t get the BooBoo reference.)

On the crafty front, Rich finally ran out of videos to upload, so yesterday I got serious and made two.  One is an art journal coloring on patterned tissue paper…I think it turned out pretty frisky…and the other was re-purposing a diamond art picture album.  It’s kind of odd as it opens from the front and the back, and is similar to an accordion.  I decided it would be cool to use as die storage, so pulled out all of my holiday dies, cut three heating register magnetic covers and tear taped them into the album.  Then I punched a hole in the side near the center, put an eyelet in, and added two strands of elastic string to wrap around the album and keep it closed.  Before I put the closure on, I needed to seal it with Deco Art Triple Thick Gloss Glaze to ensure the diamonds wouldn’t pop off.  It turned out great, but of course, it’s already completely full, so I might need to make another one, darn it.

I really do love re-purposing the diamond art products, as it gives all of us new ideas for projects and storage, and turns our storage into something pretty…. And there’s nothing better in a craft room than pretty storage systems..(in my opinion..)

4/22-4/25/2020

I finished another couple of diamond art projects.  That’s what I’ve decided to call them now, since they aren’t all diamond paintings and I have no idea what the official name could be.

Our Coronavirus total for the county we live in, stands at 19 currently.  The governor of PA thinks we should be one of the first counties to open since our numbers are so low…May 8th is the official “yellow” opening.  Yellow means very few things change, but the one that concerns me is that 25 people will be able to gather once we open, and that’s scary.  It’s not like our county has mastered wearing masks, because they haven’t….I’m not sure how the yellow opening will work.  Obviously we are continuing to get new cases, so allowing people to gather in groups of 25, opens the door to a lot more cases.

I want to think positively that things won’t get ugly, but since we haven’t mastered wearing masks, there’s a good chance that things will get worse before they get better.  The one good thing about it, is our weather will be getting warmer, and I’ll be able to spend some time outside, which I’ve been dying to do.  I haven’t been outside the house in at least three weeks, and it’s getting old.

Not so old that I’ve cleaned my craft room…but more like the longer I stay inside, the less ambition I have.  And the more junk food I eat.  It’s not pretty.  I’m lucky though, because I enjoy spending time with Rich and the dogs, so the days and weeks have passed quickly.


Decorating Wood Birdhouses

I painted the large birdhouse as well as one of the box style houses with Folk Art Chalk Paint from Joanns in a pale yellow color that’s been discontinued, but is very similar to Summer Porch (link: https://tinyurl.com/ya4jneh6 )

I bought a set of wall stickers from the Dollar Tree link: https://tinyurl.com/vtwm624 and cut the flowers and vases apart so they would fit in the spaces provided on each of the six sides of the birdhouse. Some of the birds were a little long, so I cut a portion off of their tale to make them fit. After I finished laying stickers on the birdhouse, I added Mod Podge Outdoor (Link: https://tinyurl.com/sl76ewz ) that needs to sit for 28 days before you can put it outside. Before it goes outside, you need to add a clear acrylic sealer to remove the stickiness. I did a little bit of research, and believe I’m going to give Aleene’s Acrylic Sealer (link: https://tinyurl.com/yd6rht8p) a try. If you don’t use the acrylic sealer, the outside will be too sticky, and your bird’s feet might stick to the birdhouse and we don’t want that to happen.

The second birdhouse, I painted with a turquoise acrylic paint that was too dark, so dry brushed white acrylic paint over the turquoise. Once it was dry, I took a striped blue and white napkin from the Dollar Tree…using a piece of washi tape and placing it on the back corner of the napkin, pull gently, and it should take the back paper off. You have to remove the second layer of the napkin or they will separate on your project, and you don’t want that. Once it’s removed from the back layer, take a foam brush and put a layer of Outdoor Mod Podge on the bottom of the bird house, then lay the napkin on it centering it so the napkin sides hang over the edges about the same distance and the edge of the napkin at the front (bottom edge) of the birdhouse and working toward the back, lay the napkin trying not to get many wrinkles. Once the napkin is where you want it, put Mod Podge on the back of the house and continue the napkin onto the back, then go to the top, add Mod Podge. You’ll need to make sure you account for the twine, so wrap the napkin onto the top and when you get close to the twine, figure out where you’d need to poke a hole, and then feed the napkin through the twine and finish laying the napkin on the top. You shouldn’t rip out any of the napkin where you’ve poked holes, as you can use the excess napkin left to wrap around the twine. Continue Mod Podging and wrapping the napkin to the front of the house, and lay the napkin over the hole, then continue down the front….when you get close to the perch make a hole in the napkin to push the perch through and then push the excess napkin around the perch. You can make an “X” on the hole with an Xacto (craft) knife and push the napkin into the hole. There won’t be enough napkin to surround the inside of the hole, so cut a piece of napkin the depth of the hole and about 2″ long and glue this piece into the hole with Mod Podge. Cut off any napkin that hangs over the bottom.. Now for the sides of the house, you can cut the top and bottom excess napkin off, and wrap the sides into the center and Mod Podge it there.

Once you’ve finished wrapping the napkin, Mod Podge the whole thing. You’ll want at least three coats of Mod Podge (let them dry completely between coats…I wait overnight between coats.) Don’t forget to let it sit for a month before adding clear acrylic sealer, then they’re ready to use….