Time is always so short this time of year. I saw Tina Zwick make a very similar card, and had to give this a try. I’m going to make seven cards in seven days that are fast and easy to make in bulk.
I started by using the Woodlands Textured Impressions Embossing Folder from Stampin” Up and white cardstock that is 5 1/4″ by 4″ tall. I used Marina Mist ink from Stampin’ Up and rubbed the ink pad across the front inside of the embossing folder (the side that says Stampin’ Up at the bottom)….color the folder until you’ve inked it almost completely. The part that’s closest to the fold needs inked, and the portion at the opening not so much, as your paper isn’t as large as the folder. The folder is right side up if you look at it holding the fold at the bottom (closest to you)….so you’ll need to make sure you stamp your trees with the fold of the embossing folder toward you. I used a stamp set called Definitely Decorative Pines (retired, but you might find it on Ebay) There’s an even better pine tree in their set called Lovely as a Tree that I own, but couldn’t find…I used Handsome Hunter Stampin’ Up ink (retired), but you could also use Garden Green Ink from Stampin’ Up for the same effect. I inked one of the trees and stamped the tree on top of the ink that’s already on the folder (making sure you have the fold of the embossing folder at the bottom closest to you)… I stamped three trees on mine, then took the white paper and laid it toward the center of the side I’d stamped on, and ran it through my Vagabond.
Once you have the embossed image out of the Vagabond, take a brayer (mine is from Speedball and here’s a link to it so you know what you are looking for http://tinyurl.com/yddn4zos ) Run it across the ink pad in one direction several times to ink the entire brayer. I used a Stampin’ Up ink called Soft Suede to do this technique. Gently rub it across the embossed tree image until you get the color you want. Make sure you do this with scrap paper under it, as it’s pretty messy.
I took a retired punch from Stampin’ Up called a Designer Label Punch (here’s a link to one I found on Ebay http://tinyurl.com/ydd5422k ) and punched a white piece of cardstock. Normally I would stamp my sentiment and then punch out the cardstock, but for some reason, did it in the reverse this time…It is much easier to stamp it first and then punch it out by placing the sentiment upside down in the punch and looking through the window until you see the sentiment is where you want it, then squeeze it a little bit to hold it in place, then punch it out. I used a stamp set called Lights4Xmas from Stamps of Life for a sentiment “Christmas Wishes”..(I had to cut the sentiment in half to make it fit in the punch). I put the sentiment in the MISTI and used temporary adhesive from Glue Dots (link: http://tinyurl.com/y8chxpzb ) to put on the back of my punched designer label and laid it in the MISTI so the sentiment fits inside.
I inked it with the same Soft Suede ink several times. I took a piece of 3/4″ high organza white ribbon that was about 7″ long and wrapped it around the tree image and glued it to the back..I chose to put it near the top, but you could put it wherever you choose. I ran tape runner from Glue Dots (extra strength) on the back of the tree image, and then put a small amount of wet glue under the ribbon where the sentiment would be to hold the ribbon in place, then put foam dots under the sentiment and laid it over the glued ribbon. I added some pinecones to my envelope with soft suede ink. The pinecone is from pegstamps.com and here’s a link to it. https://pegstamps.com/pinecone-large.html
Before I finished, I wanted to see if there’s an alternative to using a brayer for those of you who don’t own one….I used the ink pad first and I got ink everywhere, so tried a foam dauber for my finger tip and it didn’t work as well as a brayer either, but would probably work in a pinch….
If you don’t have a Stampin’ Up representative and would like to order the embossing folder or any of the Stampin’ Up products I used in the video, I just met a really nice Stampin’ Up representative who was kind enough to give me one of their card kits for our kit comparison….His name is Brian King and you can order directly through him using this link http://www.stampinup.com/ecweb/default.aspx?dbwsdemoid=2104107
If you have any questions, you can also email him at stampwithbrian@gmail.com. The products I used from Stampin’ Up! are: Woodlands Embossing Folder Lovely as a Tree stamp kit (it has the larger pine tree that you’d want to use). The stamp I used is discontinued.
Inks: Marina Mist (retired) Handsome Hunter (retired) Garden Green Ink would work great in place of Handsome Hunter and it’s still available Soft Suede
I hope you enjoyed our first in the series of seven simple Christmas cards….
I stayed up past midnight last night to make sure the video went live at exactly midnight, then got up at 8AM to ensure that the video and blog post were all correct. I’ll be honest, I’m not cut out for the pressure of being a guest design team member. It’s just too stressful and I left that life behind when I gave up my banking career.
I’m happy to be back to my own schedule, my own video ideas, and products of my own choosing. I’m glad I tried the experience, but am even happier that it’s over. I’d worked almost non-stop on the four cards for the last week, and I’m not equipped to that kind of schedule…You’re right, I’m now a slow pace kind of girl. I used up all of my “get up and go” when I was working, and now it’s gotten up and left me….That was not proper English, of that I am sure…
So I spent the day napping and watching YouTube videos. I know it was a big wasted day, but sometimes I just need to do that. Some people watch television, and I watch YouTube. I absolutely love watching really old Lindsay (frugal crafter) videos, as I have learned so much from her. She’s taught me so many tips and tricks and what tools to use and what tools to save money on, and I admire her for that. A lot of people say she talks too fast, but I have never had a problem with her speed. My mind races all the time, so listening to someone else whose brain is also racing, seems to relax me.
Tomorrow I’m on to some new videos and hopefully I’ll get serious about my Christmas card videos…I know Rich has a couple of videos from last Christmas that never made it online, as we ran out of time…so we’ll get those up and then I can get serious about making more…
I was sent the Banana Split kit for November with a sophisticated and elegant theme.
Included in your kit will be four card layouts, as well as a list of the items you will be receiving in your kit.
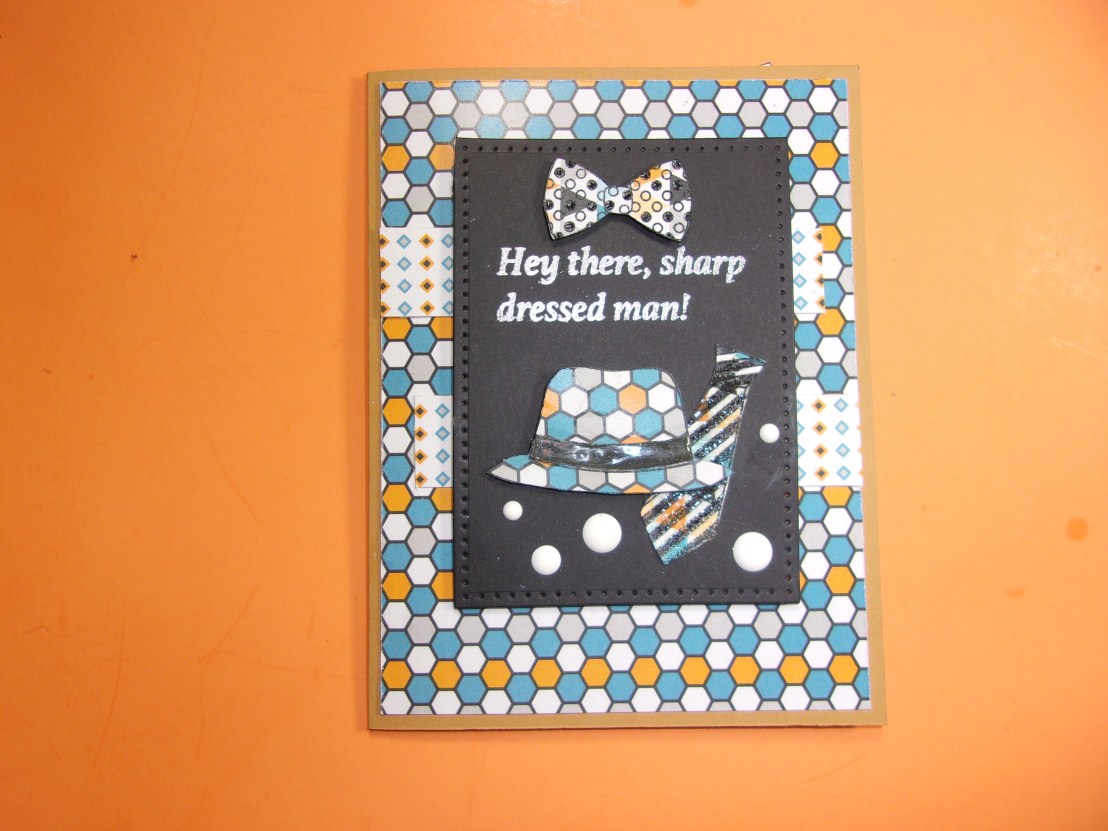
The first card I made was using the Dapper Man stamp set:
I started with one sheet of gold cardstock and cut it at 5 1/2″ on the 11″ length then scored it on the 8 1/2″ length at 4 1/4″ to create an A2 size card. I used a piece of cardstock that was half gray and half striped, and I cut two strips of the striped half, that were 3/4″ wide and used the all gray piece to cut a rectangle with a die. I used the hat, bow tie, and long tie stamps on one acrylic block, and stamped them several times on different card stock patterns (provided in the kit) and inked them with Versafine Onyx Black ink then added clear embossing powder and heat set them. I fussy cut all of the hats and ties, then stamped some hats on black card stock and gold card stock. I cut out only the band of the gold and black hats, then used an embossing marker and colored the bands then dipped them into clear embossing powder and heat set them. (If you don’t have an embossing marker, you can dip them into your Versamark glue), I glued these bands over the patterned hats I’d stamped, so the band would stand out(but still matched the colors in the hat.) Then I took a black water based marker and colored the stripes on the ties and the dots on the bow ties, and dipped them into clear embossing powder and heat set them.
I put the layout beside my card base, and glued a piece of matching cardstock that was 5 1/4″ tall by 4″ wide onto my card base. I used the strips that were 3/4″ wide by 3 3/4″ and glued one about 2″ from the top of the card on the left edge of our patterned paper, and glued the next strip about an inch lower, laying it on the right side of the patterned paper. I then took my rectangle of gray card stock and added the sharp dressed man sentiment to it with Versafine onyx black ink with clear embossing powder, and heat set it. I added the hat below the sentiment with foam squares under it, and the long tie to the right of the hat, overlapping the hat over the tie just a little bit. I added the bow tie above the sentiment and added some of the white enamel dots around the ties and hat.
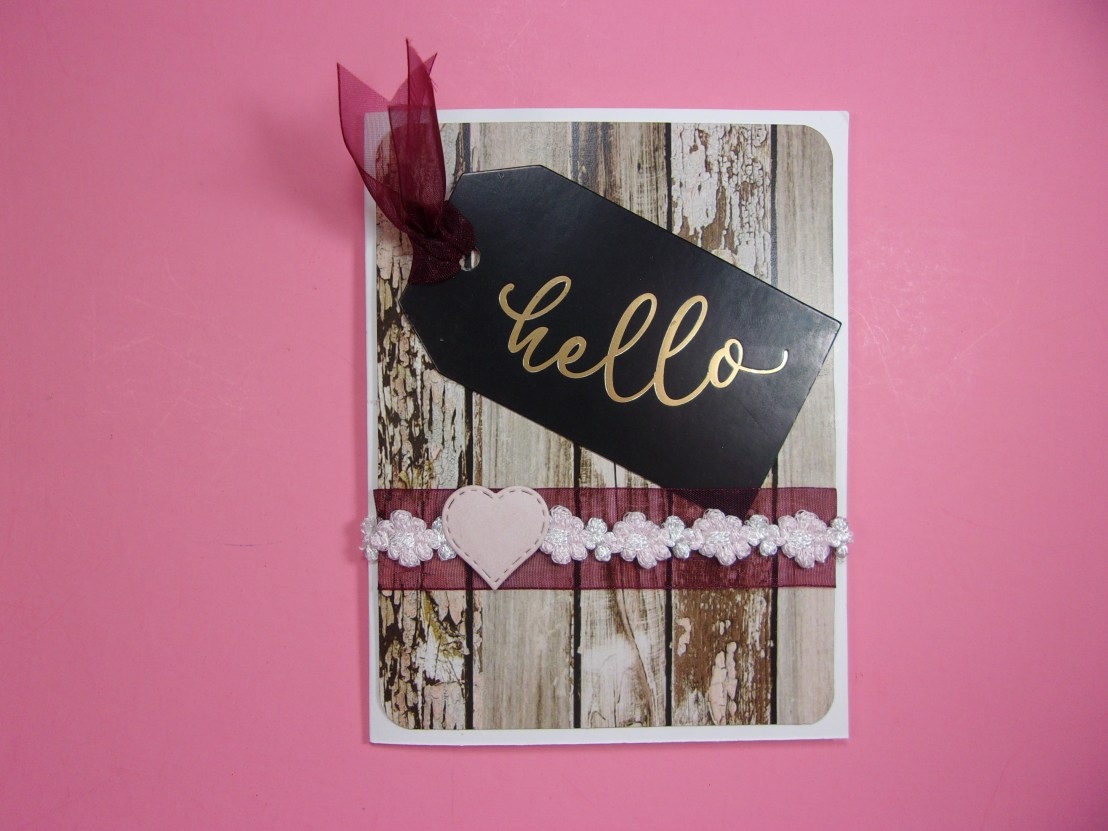
The second card I made with white Neenah paper included in the kit, and cut it to an A2 size card. I used the paneling paper and trimmed it to 4″ x 5 1/4″ then rounded the corners with my Kadumaro Pro corner rounder from Amazon. I tried to use the rounded rectangle in pink cardstock, but couldn’t get it to turn out the way I wanted it, so eliminated that portion of the layout. Instead, I layered a burgundy organza ribbon that was 1″ wide and put a 4″ length of pink and white floral ribbon centered over the burgundy ribbon. I had already glued the paper down before adhering the burgundy ribbon, so used my scissors and pushed the ends of the ribbon under the paper to glue the ribbon in place. I put the burgundy ribbon about 2″ from the bottom of the card with the white and pink floral ribbon centered on the burgundy ribbon. I used a tag that came with the kit that said “Hello” and pulled a loop of the burgundy ribbon through the hole on the tag and then pulled the ends of the ribbon through the loop and pulled them tight. I trimmed the ends like a whale’s tail by folding the ribbon in half and cutting from the center toward the ends of the ribbon to create a diagonal cut that once unfolded, creates the look of a “V”. I glued the Hello tag down with a glue stick and used Beacon’s Fabri Fix to glue the floral ribbon to the burgundy ribbon. I stamped the inside of the card with “You are so beautiful” from the stamp set provided and inked it with Stampin’ Up’s Pretty in Pink ink. I used the pink paper provided, and a heart die, and cut a heart then attached it to the left side of the floral ribbon on the front of the card with the Beacon Fabri Fix glue. I stamped the back with “Made by Sandy Parker” stamp that I had made by Stampanda.com.
For the third card, I wanted to make a 5 x 7″ card with the little girl stamp made by Santoro. I started with pink card stock cut to 10″ by 7″ and scored on the 10″ side at 5″, to make a 5 x 7″ card. To follow the layout, I needed to use three dies. I used a square die that was the same size top to bottom as the inner oval die I was using. Then I used another oval die that was about 1/2″ taller than the first die. I wanted to use them to create a frame, since I didn’t have an oval scalloped die like was shown on the card layout. The first thing I did was cut out different papers with the dies. I used a black floral image to cut the ovals, and made sure they were well spaced from each other, then taped them together to ensure when they went through the die cutting machine, they would stay even with each other. I took the center of the oval and used my “Sparkle” die (that came with the kit) and cut it out on the die cutter. (You need to keep all of the small pieces that fall out of the letters.) I took my oval and put a piece of scotch tape on the back and laid the word Sparkle in black foam into the opening created by the die cut. I then laid the small pieces back into the sparkle that fell out of the letters. I decided I wanted a black card stock over the foam, so cut it out with the die, and glued it over the foam….I used a Spectrum Noir glitter pen to add sparkle to the word sparkle. I took this oval and glued it in the inside of the card and added a sentiment from Ellen Essentials stamp set called Sparkle (that was not included in the set) that said “You make my life” stamped in black ink on pink cardstock and laid this right above the word Sparkle.
The square die I cut with another patterned paper and set it aside. I wanted to use a black and white patterned paper for my background, but I only had 6 x 6″ paper packs….so I took the 6″ long paper and cut it to 4 3/4″ wide and then cut it in half at 3″. I used a piece of cardstock with shoes and purses on it, and glued it to a pink piece of paper that was 1″ tall by 4 3/4″ wide, then laid the 3″ black and white pieces next to a ruler, so I could lay one piece at zero and the other piece to stop at 6 3/4″ so there’s a gap between the two papers. I used a glue pen and glued the edges of the center of the black and white papers and then laid the strip I’d created with pink paper over that gap and glued it down. Then glued the shoe paper into the center of the pink paper (this strip was 4 3/4″ wide). This allowed me to turn a 6″ piece of cardstock into a 6 3/4″ tall piece. I then glued this piece to our 5 x 7″ cardstock. I took a piece of the white Neenah cardstock and used the smaller oval die to cut it out. I stamped #53 Sugar and Spice Santoro girl stamp with Simon Says Stamp ink (as it works well with alcohol markers.) I used some Spectrum Noir markers and a bunch of Touch Five alcohol markers to color the Sugar and Spice doll. I added some Reminsce white gel pen that was provided in the set to make lines in her skirt and decided to put her on foam squares on the front of the card. I took the pink square that I had die cut and went around the edges with Walnut Stain Distress Oxide ink and also went around the edges of the oval of our stamped doll with the same ink to make it look more cohesive next to the brown oval. I glued the square into the center of the card, then laid the doll centered over the square, then glued the oval frame around her with a glue stick. There were pink rhinestones included in the set, and I used an alcohol marker to color over them to make them match the colors in the card better, then glued the rhinestones around the doll and in the squares of the background paper. I added Spectrum Noir glitter pen to her hair and over the “sparkle” on the inside of the card. I cut out a sentiment strip that said “Life is a party” and added that to the right side of the front of the card near the top… That finishes our third card.
I stamped the back with my Stampanda stamp and went on to our fourth card.
Our fourth card is simple, and involves the lady with the butterfly skirt stamp called “What if I fly”…. This is an A2 size card with a white card base. I used one of the papers from DCWV that was floral filigreed and I cut it to 4 1/8″ x 5 3/8″ and glued it to my white card base. Then I took a strip of the black glitter paper and cut it to 4 1/8″ wide by 1 1/2″ and glued it over the paper at the very top of the card. Then took silvery paper that is 4 1/8″ wide by 1″ tall and glued it directly beneath the black glitter paper. Then I took black glitter paper again and cut it 1 1/4″ tall on the left side and 1/2″ on the right side. I drew the marks on the back of the paper and used my paper trimmer to cut it out. I then took another piece of the silvery paper that was 2″ by 1 1/2″ and then outlined it with black glittery paper by holding the black paper under the silver paper and trimming about a 1/8” border around it. I cut a “V” in the bottom of the black paper and cut it out of the silver paper by holding it (again) about 1/8″ away from the bottom edge.
I had cut a circle out that was large enough to hold the lady with the butterfly skirt, and stamped her with Versafine Onyx Black Ink and then heat set it with clear embossing powder. I also stamped some of the butterflies that were included in the set and put clear embossing powder over them as well. I added black foam to the back of the circle die cut and glued it together with a glue stick, then glued the circle to the front of the card on the silver strip toward the top of the card. I stamped the sentiment from the set inside the card.
Here’s the link that will take you to the blog hop…Hope you enjoy all of the terrific cards these ladies made:
I finished some videos that I wanted to go live before Black Friday, as there are some discount codes I don’t want anyone to miss out on. I also made a pearl covered pumpkin and thought that would be a nice way to post a video, as well as wish viewers a happy Thanksgiving.
I’ve been working diligently on the four cards I created from the card kit for Scrapping for Less and Rich has been working on editing the video tonight. In the middle of it, he came to me and said he’s missing a memory stick (again!) I’m starting to get so frustrated with this continuous problem, that I’m almost ready to throw in the towel on the channel. I don’t have any ideas on how I can avoid these sticks being misplaced, as I put them in an envelope inside a notebook with all of the information I need edited. If there is more than one video on that memory card, Rich sometimes accidentally deletes the extra videos, which is what happened with my sister’s birthday card. I’d love to show you that video, but if he doesn’t find the first three clips, it’s pointless, because I did all of the work with the Nuvo powders in those clips. Tonight he thought there were two missing clips. I thought I was going to lose my mind because I’ve been working on those cards for days and if one card’s videos were missing, I had no idea how to overcome the problem. We went through every notebook and my office, when apparently an idea came to him, and he said he found the clips. I told him if we hadn’t found those clips I was seriously considering throwing in the towel on the channel, because I just can’t handle putting so much work into a project, just to have the video disappear. So I’m coming up with a new plan. I think I’m going to copy the memory card onto the hard drive of my computer, and if the clips disappear, I’ll have a back up. I just can’t keep going through this, it’s just too stressful. That might sound a little bit hysterical to you, but this is three times in a two weeks that we’ve gone through every memory card trying to find missing clips, and it’s work that’s lost, and seemingly for two of the videos, not to be recovered.
My friend Shelly sent me a really cute card and I wanted to share it.
I’ve been shopping and here are some of the things I’ve bought lately.
1. Stampin’ Up Woodlands Textured Impression (embossing folder) that could either be birch or aspen trees.
If you don’t have a Stampin’ Up representative, and are interested in buying one of these folders, you can contact Brian King, whose been so kind to send me a free paper pumpkin kit. His email is stampwithbrian@gmail.com and he’d be happy to help you.
Perfect Layering Circle stamps: I included the link for all of the layering circles, and you can decide which size will work best for you, or if you would like to buy the entire set. I used the second largest stamp for my circles on the color sheet.
link: http://tinyurl.com/yaup8a9v
I wanted to let everyone know that I’m still collecting monthly stamp kits to do a comparison video of the card kits, the value, are there rules to the kits, etc….
I bought this pumpkin after Halloween last year, and thought it was more pliable…but it’s not. I wanted to stick thumbtacks into it, but the pumpkin wouldn’t allow me to shove anything into it….So I saw a video where someone used pearls in a row instead, and thought I’d give it a try.
I used the ribs of the pumpkin (yes, that’s the real name for them), and attached the pearls on either side of the ribs. I bought my pearls a long time ago at the Dollar Tree….and if you have them in different colors, it doesn’t matter as you’ll be spray painting over them….
I covered the sides of each rib with pearls then took the pumpkin outside and spray painted it with Rustoleum 2X spray paint. I spray painted a second layer once the first was dry, and it’s now on my Thanksgiving table…
I hope all of you in the United States, have a happy Thanksgiving.
I finished the third card for the Scrapping for Less guest design team, and I’ll be so relieved when I finish the fourth one. I put so much pressure on myself, and wonder how women who are actually on these teams can handle it. I guess since they only get these kits once a month, they only have one week of pure stress, but still….I haven’t worked since 2005, so had forgotten the stress I put on myself to make sure I do the best job I can. Looking back, I have no idea how I handled life. I ran seven branches and now I can barely do laundry and contemplate what to make for supper….I can’t imagine how I got the housework done, the laundry, and made meals plus worked up to fifty hours a week. It’s all a blur now, but back then, I just remember how stressed the pager, voicemails and cellphones made me. It’s one of the reasons I haven’t gotten a “big girl” phone. I still use a flip phone and barely remember to carry it, and it’s almost never charged. I realize that I’m old school, but I have no interest in being so connected…I played that game when I worked, and it was too much for me. I’m relieved that I’m old enough that it doesn’t matter if I know how to do an app or how to text. All that matters is Rich knows how to do these things and I can rely on him if I need to…when you’re partners, it’s good to know the other’s strong suits…mine is paying bills and doing laundry, and he handles the tech stuff.
I was lucky to be sent the Arteza rotary cutter to determine if I can use it, as well as showing you how to use the cutter and to offer you a discount code. As usual, I am not paid for sales of these products, but I love being able to show you tools I try out, as well offer discount codes for everyone.
Always leave the safety engaged as this blade will cut you…and I mean cut you…..There’s an orange button on the side, and you’ll want to push on that button and pull it toward you to expose the blade. The blade has its size written on the side…mine is a 45mm blade. You will receive the rotary cutter plus five blades when you order from the links.
To change the blade, unscrew the orange screw on the back and remove the washer then turn the cutter over and the blade will drop out with the screw in it…to put a new blade in, use the bolt with the screw attached, slide over the blade opening and put the blade onto the screw…Then put it through the opening on the cutter and put the washer on and then the screw it until it is tight.
You will always want to use a cutting mat that is self healing. If you use anything else, you’ll cut into it and ruin the surface beneath it. When you use the self healing mat, don’t put it in the sun as it will warp, and make sure you lay it flat, as if you don’t keep it laying flat, it will get a weird bend in it and you won’t be able to flatten it.
I recommend you also use a quilting ruler (or a wide ruler) so you have a large plastic piece to hold onto and something that you can cut against for a straight edge.
You should only cut fabric with the rotary cutter and at most, cut through up to four layers of a thinner fabric safely. I found the Arteza rotary cutter easy to use, even though I am left handed. I tried with both left and right hands, and didn’t have any trouble using it.
Always keep the safety mechanism in place when you aren’t using the cutter, as it is super sharp.
I cut through a thin fabric, a craft fabric and felt, and I had no problem cutting any of it. You should only use the rotary cutter for fabrics.
I have four different packets of card making tools from Scrapping for Less. They asked me to be a guest designer, and I’ve been working really hard the last couple of days to make sure I finish the cards in time for their blog hop on Friday. I’ve never done anything like this, and am feeling really foolish, as the owner keeps using terms that are outside of my vocabulary. She said I need to provide her with a Permalink (OK, I might have made that term up, as now that I read it, I’m more confused than I was before.) I also need to attach a banner for her channel, and I don’t have a clue where that goes either. It was so kind of them to send me their monthly card kit, and I never in a million years, thought anyone would ask me to be a guest design team member, but here we are.
I am trying to only use the products they provide, but that’s not going well for me and I keep inserting things from my stash. Is that acceptable or will they be upset that I broke from the way they wanted things…..YIKES! I honestly don’t know how people on design teams get anything else done. I see these women who make ten cards from a card kit…How many years are they working on those cards? It’s taking me forever to get two cards done and I still have two to go. And I can’t imagine how long this video will end up being….I don’t want to let anyone down, and I’m trying to follow their game plan, but my end result doesn’t look like theirs….I can only do my best, right?
Yesterday, I got an email from one of the companies that said they would send me their monthly card kit at no cost. The email said that I’m a “guest design team member.” Holy cow! I thought I was going to be doing a simple comparison of several monthly card kits, and now I’m a guest design team member. I’m not sure if I’m up for the challenge, but I’ll give it a try. I think I was more surprised than anything….I just don’t want to let them down.
I thought it would be a good idea to compare monthly card kits to see if some give a better value than others, and to find out if one has better options. I’ve belonged to the Hero Arts kit for a year and a half and have only used one kit…the one with the county fair where I made a box card. I loved that kit, but the rest have not been anything that I thought I would use. So last month I joined Simon Says Stamps kit, because I seem to like the stamp sets in their kits better than those in the Hero Arts kits. I’ve only gotten one kit and I really liked it. I didn’t know I could contact them and tell them I don’t want the current month’s kit, and so this month, for the December kit, I contacted SSS and asked to skip that kit…No problem. I joined Sparkle n’ Sprinkle’s kit and only got one, and found it to be a huge disappointment. I don’t know how to say that on video, because I really like their products overall, but the kit was poorly put together and didn’t really seem to give you a good value for the price you pay for the kit. So after only one month, I cancelled that subscription. I bought a Stamps of Life kit they were selling on HSN.com and think it’s definitely worth the money….the others, I got for free. One is from Spellbinders/Fun Stampers Journey and the other is from Scrapping for Less, whose the company that has asked me to be a guest design team member. I asked other companies for a sample kit, but either didn’t get a response, or was told no thanks. That’s OK with me, as I think I’ve got enough now for a fair representation of what people will be getting when they purchase these kits.
I finished the postcards and put the video up for the November SSS kit, and am happy that I also got the postcards in the mail That’s the hardest part for me, actually putting things in the mail…I even had the stamps here, so it was just a matter of taking them to the post office….At least they’re on their way now…